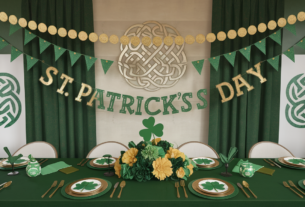
St. Patrick’s Day crafts are a fun way to get into the spirit of the holiday while adding a personal touch to your celebrations. Grab some green paper, shamrock stickers, or even a few pots of gold (chocolate coins work great!) to create festive decorations or gifts. To start, gather your materials: construction paper, scissors, glue, and markers are all essentials. Look for simple templates online or let your creativity flow by designing your own. Pro tip: use double-sided tape for a cleaner finish, and don’t hesitate to get the kids involved—crafting together makes for memorable moments!
Celtic Knot Coasters
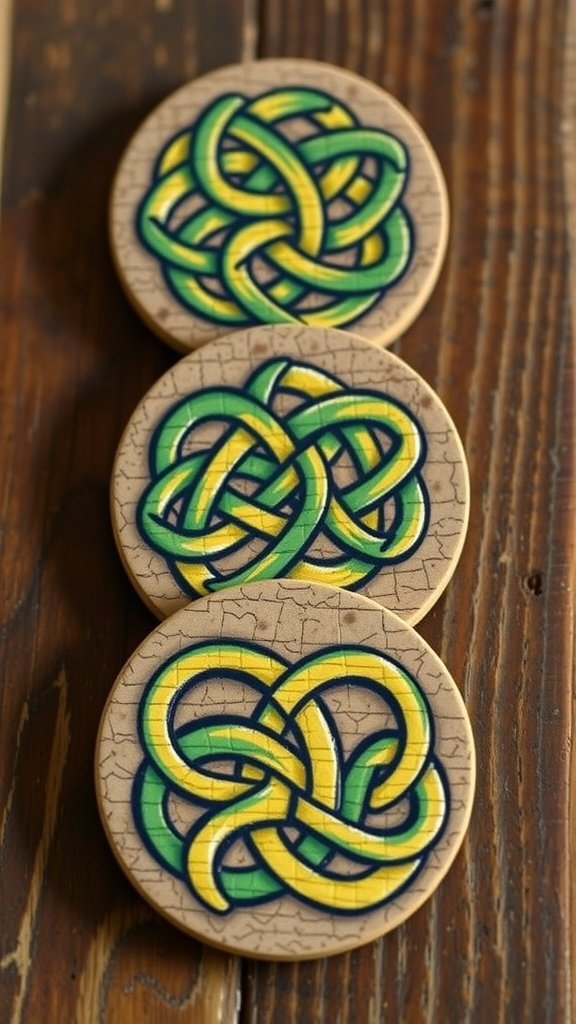
Looking for a fun way to add a bit of Irish charm to your home this St. Patrick’s Day? Why not create some Celtic knot coasters? These beautiful designs not only serve a practical purpose but also celebrate the rich heritage of Celtic art.
To get started, here’s what you’ll need. Gather some cork coasters, acrylic paint in green and gold, a small paintbrush, and a pencil for sketching. If you want a finished look, consider using a clear sealant to protect your artwork.
Instructions: First, sketch your favorite Celtic knot design lightly onto the coasters with a pencil. Once you’re happy with the design, paint over it with your acrylic colors. Allow each coat to dry before applying another layer. For a glossy finish, apply a sealant once everything is completely dry.
Pro tip: If you’re not confident in your freehand skills, print out a template of a Celtic knot and trace it onto your coaster. This will help you achieve a cleaner look. You can even experiment with different colors to match your decor!
DIY Luck of the Irish Garland
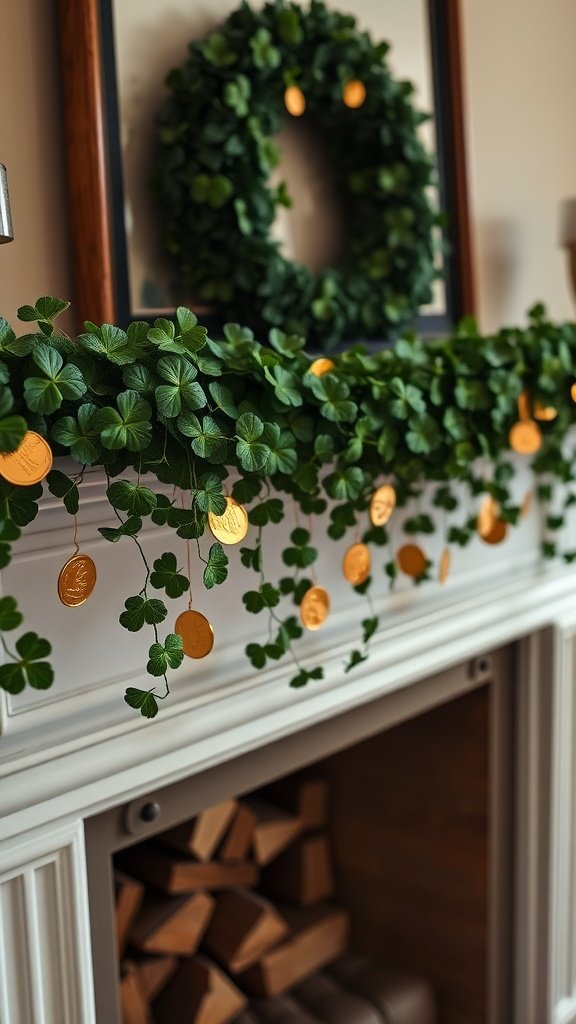
St. Patrick’s Day crafts bring a festive touch to your home, and a DIY Luck of the Irish Garland is a fun way to celebrate. This garland features vibrant green shamrocks and shiny gold coins, perfect for hanging above a mantel or across a doorway.
To create this charming decoration, you will need a few simple supplies. Gather artificial green shamrocks, gold foil coins, twine or string, scissors, and a glue gun. These items are easy to find at craft stores or online.
Instructions: Start by cutting the twine to your desired length. Next, glue the shamrocks and coins onto the twine, spacing them evenly. You can alternate between the shamrocks and coins for a balanced look. Once everything is glued securely, let it dry completely.
Pro Tip: For added flair, consider adding some glitter to the coins before gluing them down! This will catch the light beautifully and enhance the festive spirit.
Once your garland is ready, hang it up and enjoy the cheerful atmosphere it brings. This DIY project is not only a delightful way to decorate but also a fun activity to do with family or friends. Enjoy crafting your own luck of the Irish this St. Patrick’s Day!
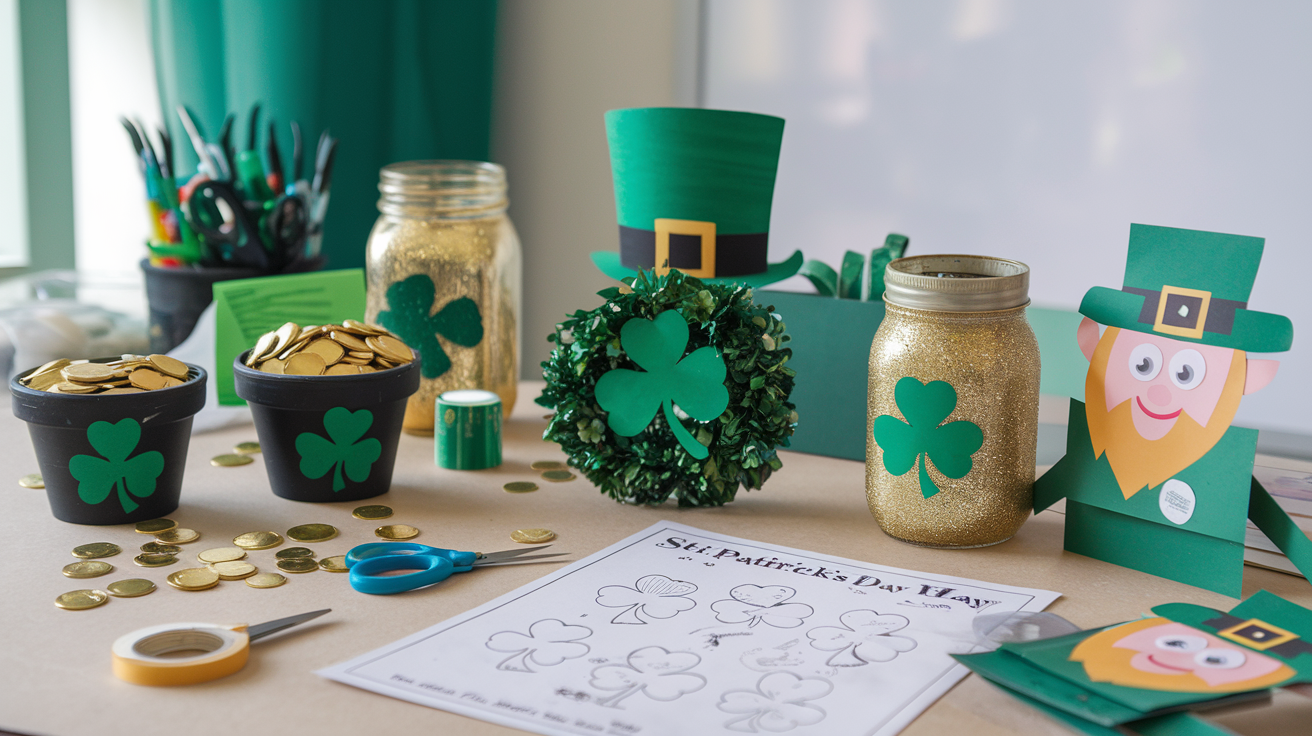
Decorative Pots of Gold Coins

Decorative pots of gold coins are a fun and easy addition to your St. Patrick’s Day crafts. They can bring a touch of whimsy to your decorations and are perfect for creating festive atmospheres. Imagine having these shiny coins scattered around your home or placed in pots as part of a treasure hunt!
What you will need for this craft are some gold foil chocolate coins, small pots (like those used for plants), and green decorations such as paper shamrocks or ribbons. You could also add in some fairy lights for an extra sparkle.
Instructions: To create your decorative display, simply fill the pots with the gold coins. Decorate with paint, shamrocks and other green St Patrick’s Day symbols and wrap with green ribbons. Arrange them around your home or use them as part of a centerpiece on your table. You can even hang some coins from a string using a little bit of tape for a unique garland!
Pro tip: If you want to make the coins more personalized, you can use gold craft paint to cover ordinary coins or cardboard cutouts. This way, you can create your own unique designs. Don’t forget to make it a fun family project, letting everyone add their personal touch!
Leprechaun Hat Decoration
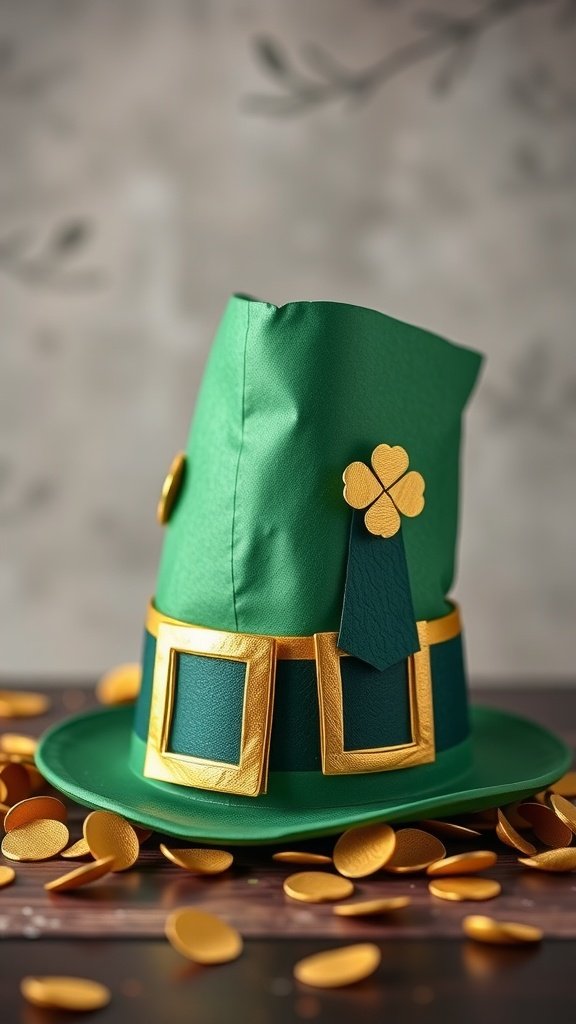
St. Patrick’s Day crafts bring a splash of fun and creativity to the celebration. One delightful project is making a leprechaun hat decoration. This vibrant green hat is not only a classic symbol of this festive day but also a charming addition to any St. Patrick’s Day decor.
To create your own leprechaun hat, you’ll need a few simple materials. Gather green cardstock or felt, gold foil paper, scissors, glue, and a pencil. Optional items include decorative stickers or glitter to give your hat some extra flair.
Instructions: Start by drawing a large circle on your green cardstock. This will be the base of the hat. Next, cut out a tall rectangle for the hat’s body and roll it into a cone shape. Secure the edges with glue. Attach the cone to the center of the circle base. This forms the classic leprechaun hat shape.
Now, for the embellishments! Cut out a rectangular strip from the gold foil paper to create the hat band. Glue it around the base of the hat cone. You can also make a buckle by cutting a square and a smaller rectangle from the gold foil. Attach these onto the hat band to give it that signature leprechaun look.
Pro Tip: For an added touch, cut out a four-leaf clover shape from the leftover green material and attach it to the side of the hat. Not only does it enhance the charm of the decoration, but it also ties in perfectly with the St. Patrick’s Day theme!
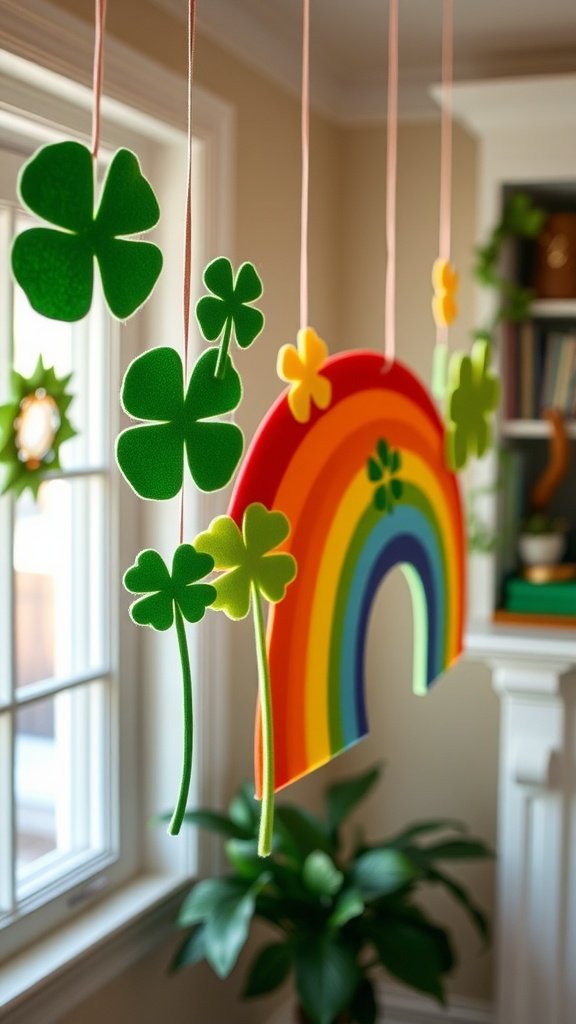
Rainbow Paper Chains
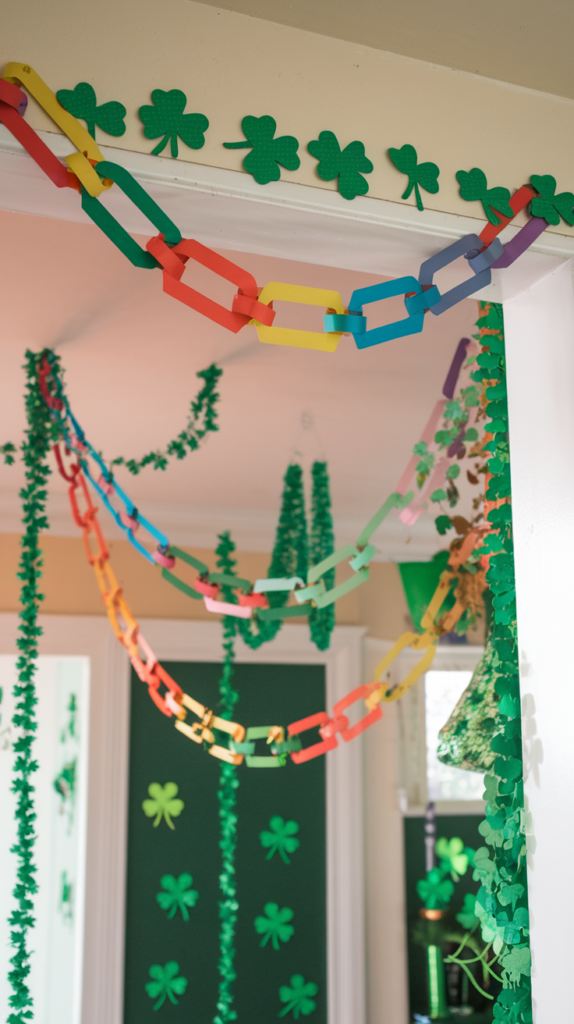
Rainbow paper chains are a fun and colorful way to celebrate St. Patrick’s Day. These chains add a festive touch to any space and are easy to make. Plus, they can be a delightful project for kids and adults alike!
What is needed:You will need colored paper in shades of red, orange, yellow, green, blue, and purple. Scissors, glue, or tape will also come in handy. If you want to get creative, consider adding glitter or stickers for extra flair.
Instructions: Start by cutting the colored paper into strips, about 1 inch wide and 6-8 inches long. Take the first strip, form it into a loop, and secure the ends with glue or tape. Next, take another strip, thread it through the first loop, and then form it into a loop. Continue this process until you have a chain of your desired length. Hang your beautiful rainbow chain in a doorway or across a wall for a festive look.
Pro tips:For a more vibrant look, use a mix of bright and pastel colors. You can also make different sizes of loops to create a more dynamic design. If you have little ones helping, consider pre-cutting the strips to make the process quicker and easier!
Pot of Gold Craft

St. Patrick’s Day is all about fun and creativity, and what better way to celebrate than with a pot of gold craft? This craft is not only simple to make but also adds a festive touch to your decorations. Imagine a charming black pot filled with shiny golden coins, just like the legends say!
To create your own pot of gold, you’ll need just a few materials. Here’s what is needed: a small black pot (you can find these at craft stores or online), gold foil or painted coins, and some faux gold coins to fill the pot. These coins can be purchased or made from cardboard and painted gold.
Now, let’s get to the fun part—Instructions! First, gather all your materials on a clean workspace. Fill the black pot with the faux coins or gold-painted cardboard coins. You can layer them for a more abundant look. Once the pot is filled, you can sprinkle a few coins around it for a truly magical effect.
For an extra touch, consider adding some green shamrock decorations around the pot. You can cut out shamrocks from green paper or use stickers. This will enhance the St. Patrick’s Day theme and make your craft even more festive!
Pro tip: If you want a bit more sparkle, consider adding some glitter to your faux coins or using glitter glue around the pot. This will catch the light and give it a dazzling effect. Plus, your kids will love getting a little messy while crafting!
Shamrock Stencil Art
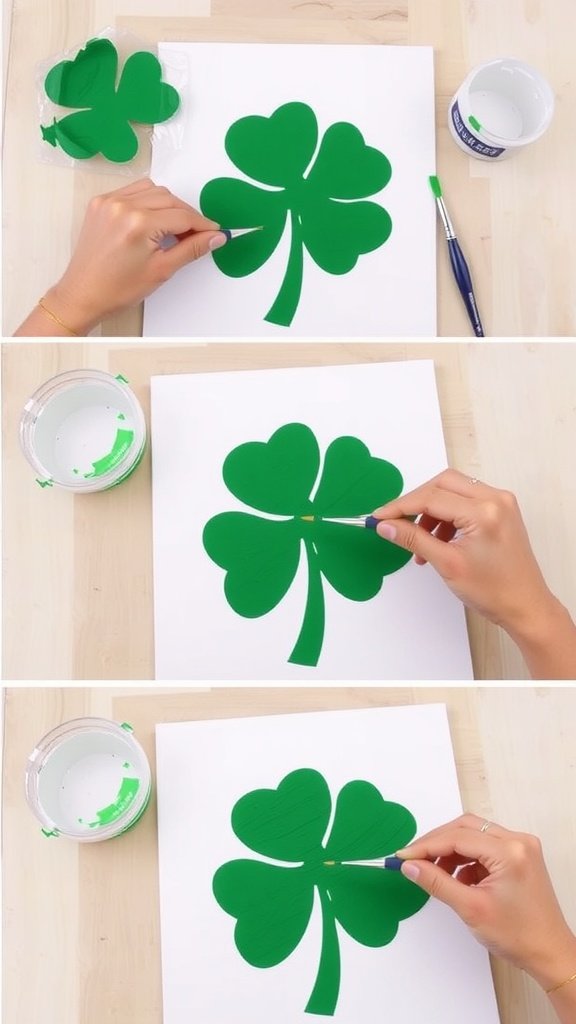
Shamrock stencil art is a fun and simple way to celebrate St. Patrick’s Day. This craft is perfect for all ages and brings a cheerful vibe to your home. With just a few supplies, you can create beautiful pieces of art that show off your festive spirit.
What is needed: You will need a canvas, green acrylic paint, a shamrock stencil (which you can buy or easily make), a paintbrush, and some painter’s tape. Optionally, you can have some sponges or additional colors of green paint for a layered effect.
Instructions: Start by securing your stencil onto the canvas using painter’s tape to prevent it from moving. Use your paintbrush to apply green paint over the stencil. Make sure to cover all areas evenly. If you want a bit of texture, try using a sponge to dab on the paint instead. Once finished, carefully remove the stencil while the paint is still wet to reveal the shamrock shape.
Let your artwork dry completely before displaying it. You can hang it up or use it as a centerpiece for your St. Patrick’s Day celebrations.
Pro Tips: To avoid paint bleeding under the stencil, use a small amount of paint on your brush. Less is more! If you want to add more details or different shades of green, let the first layer dry before adding more paint. This craft can also be turned into a fun group activity; invite friends or family to create their own shamrock designs!
St. Patrick’s Day Greeting Cards
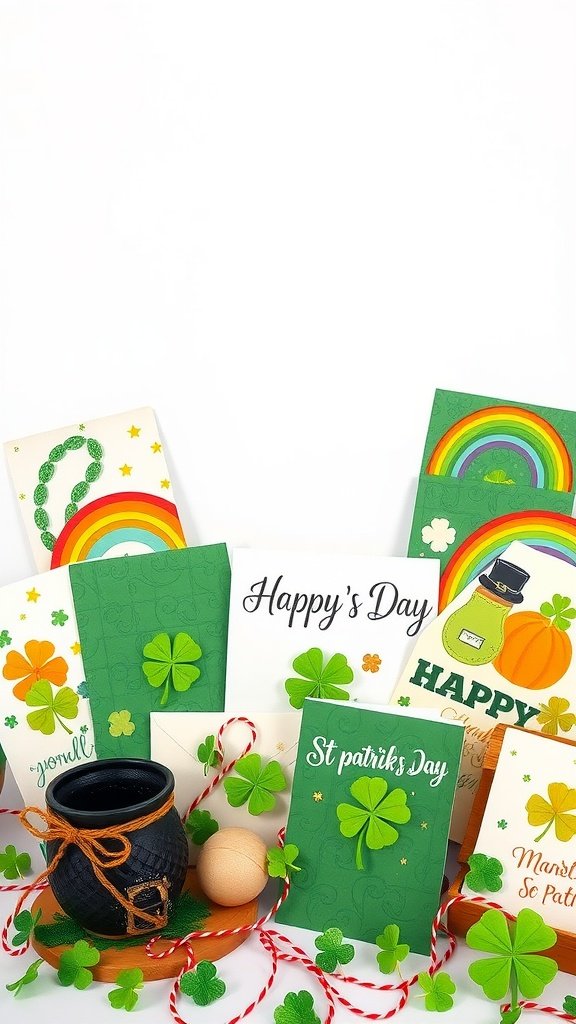
Making St. Patrick’s Day greeting cards is a fun way to celebrate the holiday. These crafts are not just simple; they allow you to express your creativity and share some festive cheer with friends and family.
To get started, you’ll need a few materials. Gather some blank cards or cardstock, green and gold paper, scissors, glue, and any decorative items like stickers or markers. You can also include a pot of gold or shamrock designs for a classic touch.
Instructions: Begin by folding your cardstock or blank cards in half to create the base. Cut out various shapes like shamrocks or rainbows from the green and gold paper. Glue these shapes onto the front of the cards. For added flair, use markers to write messages like “Happy St. Patrick’s Day” or “You’re a Lucky Charm!” on the cards.
Pro Tip: To make your cards extra special, consider adding glitter or metallic accents. This will catch the light and give your cards a festive sparkle.
Another idea is to create a pop-up element inside the card. Simply cut a small sliver of paper, fold it, and glue it to the inside. When the card opens, a fun surprise will pop up!
These St. Patrick’s Day crafts are a great way to connect with loved ones. Plus, they make for delightful keepsakes that can be cherished for years to come.
Gold Glittered Mason Jars
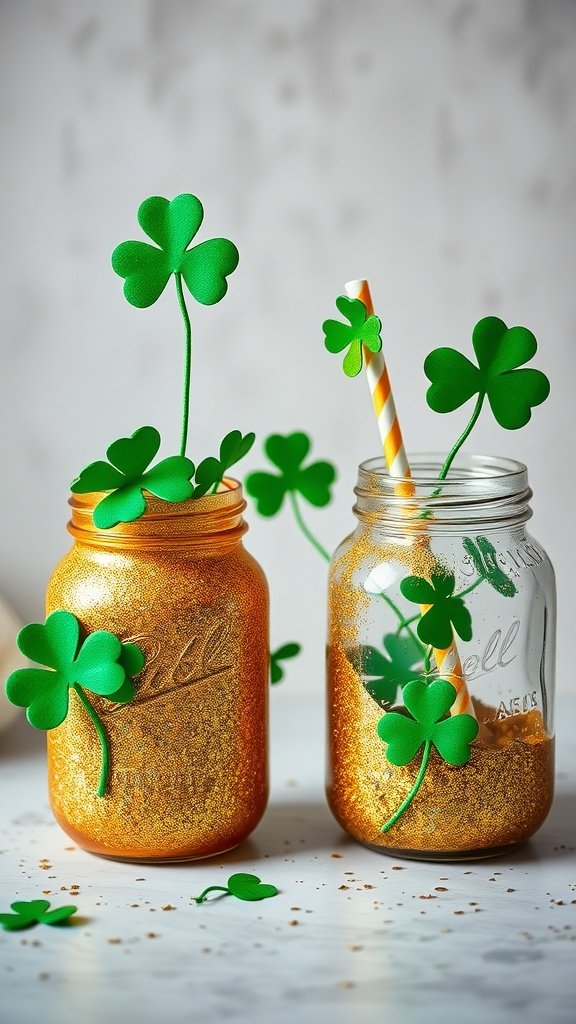
Have some fun creating Gold Glittered Mason Jars for St. Patrick’s Day! These jars not only look festive, but they also bring a touch of sparkle to your home decoration. You can use them as centerpieces or even as cute holders for snacks during your celebrations.
To create these glittery treasures, you’ll need a few supplies. Gather some mason jars, gold glitter, green foam shamrocks, and a glue stick. Don’t forget your favorite adhesive to secure the shamrocks to the jars!
Here’s how to make them: Start by applying glue to the outside of the mason jar. Then, sprinkle a generous amount of gold glitter over the glue. Shake off any excess glitter. Once that’s dry, glue on the foam shamrocks to complete the look. This simple process makes for a lovely, shiny decoration.
Festive Shamrock Wreath
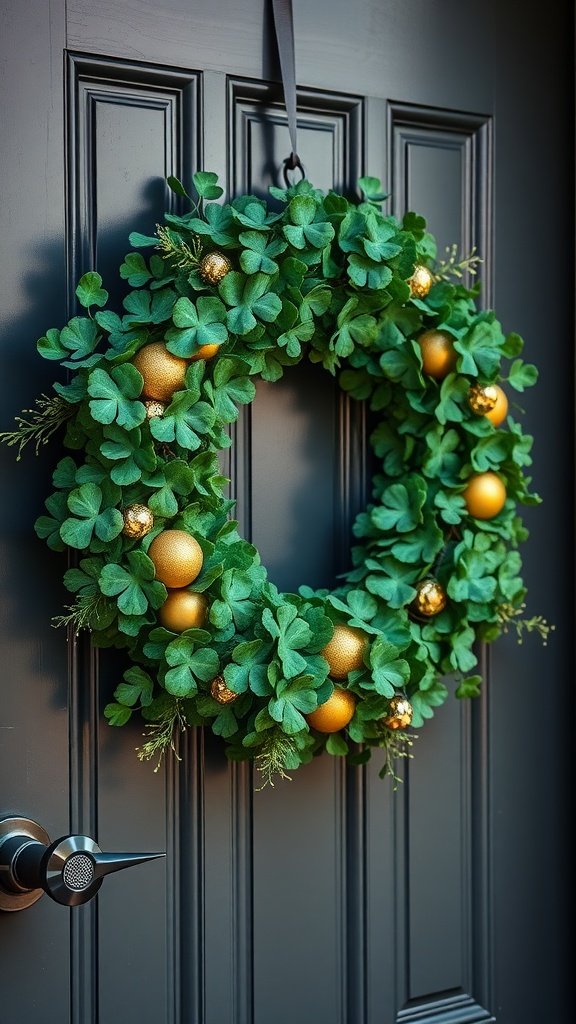
If you’re looking for a fun way to celebrate St. Patrick’s Day, a shamrock wreath can be a charming addition to your home. This wreath, decorated with vibrant green shamrocks and shiny gold ornaments, brings a pop of color and cheer to any door.
What you’ll need is simple: a foam wreath base, artificial shamrocks, hot glue, and some decorative golden balls. You might also want a ribbon for hanging. This craft is perfect for those who enjoy hands-on projects and want to add a personal touch to their decorations.
Instructions: To make your wreath, start by wrapping the foam base with the shamrocks. Use hot glue to secure them in place, layering them for a fuller look. Once the base is covered, it’s time to add the golden ornaments. Space them out evenly and glue them on securely. Finally, attach a ribbon at the top for hanging.
Pro tip: If you want your shamrock wreath to last longer, consider using faux plants that can withstand the elements. This will keep your wreath looking fresh throughout the season. Plus, you can easily store it for next year!
Four-Leaf Clover Seed Bombs
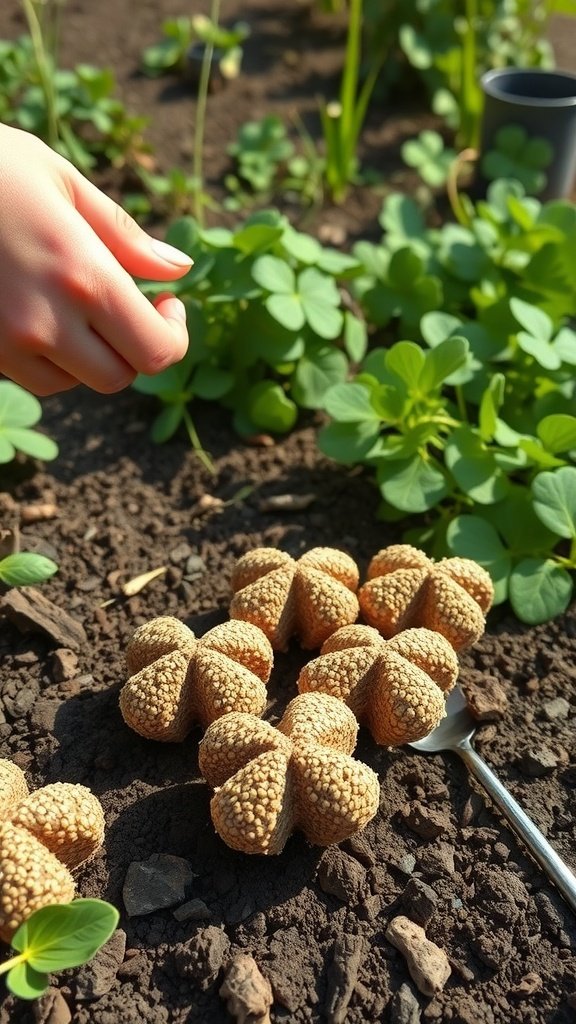
St. Patrick’s Day is not just about wearing green; it’s a perfect time to embrace nature with some delightful crafts. One fun idea is creating four-leaf clover seed bombs. These little packets of joy can be thrown into your garden or any patch of soil, promising a burst of greenery and a sprinkle of luck!
To make these seed bombs, you will need some clay, compost, and seeds of clover. You can find these materials at any gardening store.
Instructions: Mix one part clay, three parts compost, and add a handful of seeds. Knead this mixture until it forms a dough-like consistency. Roll the mixture into small balls or, better yet, into clover shapes!
Once you have your seed bombs ready, let them dry for a day or two. After they are completely dry, they are ready to be planted. You can toss them in your garden or give them as gifts to friends and family. Each time you see them sprouting, you’ll remember the fun you had making them!
Clovers and Rainbows Window Clings
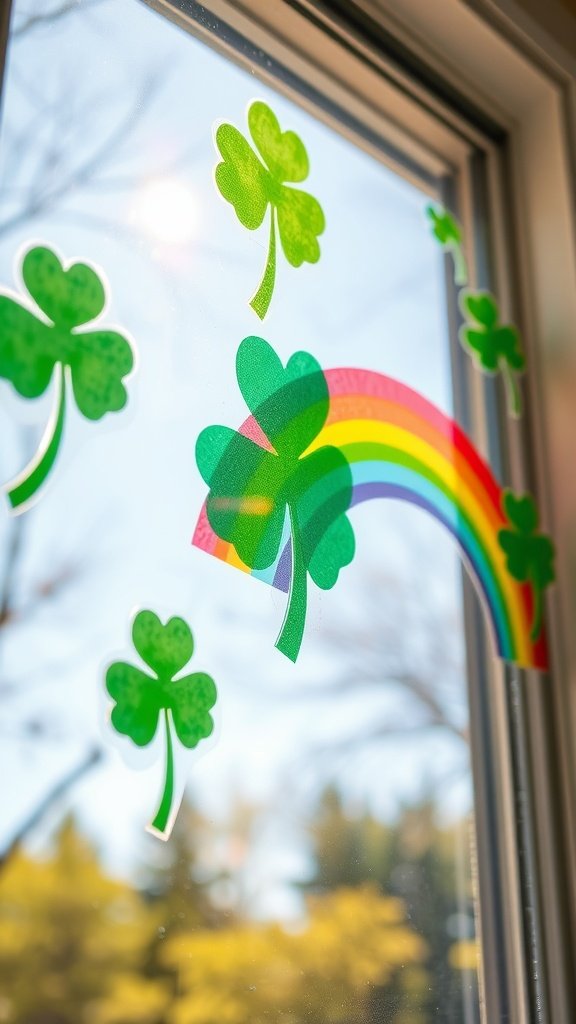
St. Patrick’s Day is all about celebrating luck and joy, and what better way to brighten up your home than with clovers and rainbows window clings? These crafts are simple to make and bring a festive touch to your space.
To create these delightful decorations, you will need a few materials. Gather clear plastic sheets, craft scissors, green and rainbow-colored markers or paints, and a puffy paint or glue for added texture. You can also include a pencil and a template of clover shapes if you prefer a guided approach.
Here’s how to make them:
- Start by sketching clover shapes on the plastic sheets. You can use a template or draw freehand.
- Color in the clovers with green markers or paints, letting them dry completely.
- For the rainbows, draw an arch shape and fill it with various colors to mimic a rainbow.
- Once everything is dry, cut out the shapes carefully.
- Finally, use puffy paint to add some texture or details to your designs, such as outlines or dots.
To apply your window clings, simply wet the glass surface slightly and press the cling on. It will stick without damaging your windows.
Pro Tip: If you want to create a more lasting version, use a clear adhesive to seal your designs. This will protect them from fading and make them easier to remove later.
Paper Leprechaun Puppets
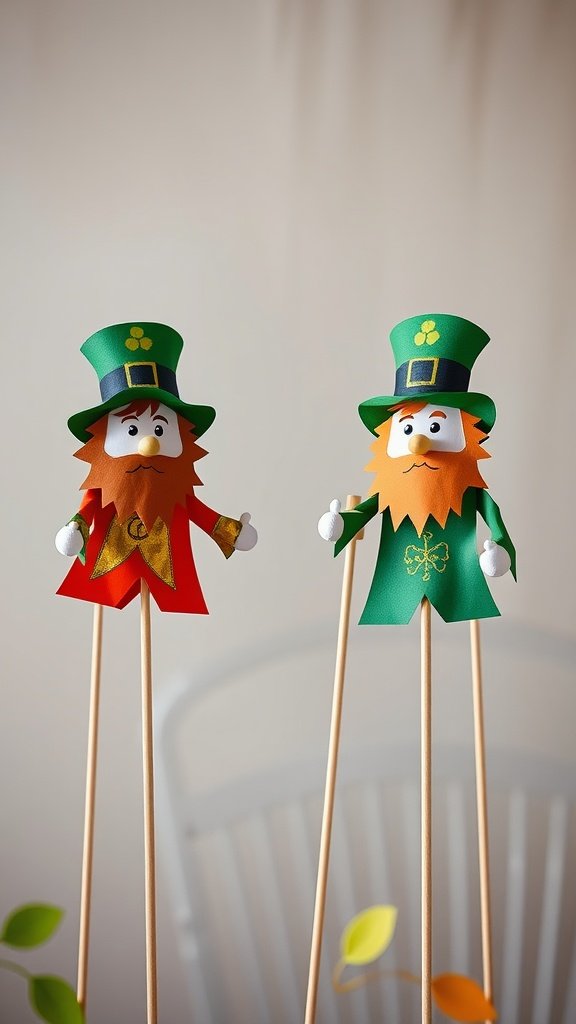
St. Patrick’s Day is a fun time to get creative, and making paper leprechaun puppets is a delightful way to celebrate! These puppets can bring smiles and a bit of Irish charm to your festivities.
To create these charming leprechauns, you’ll need a few simple materials. Gather colored paper in green, orange, and white, scissors, a glue stick, and some wooden craft sticks. You might also want some markers or crayons for adding details.
Instructions: Start by cutting out the leprechaun shapes from the colored paper. Use the green paper for their hats and coats, orange for their beards, and white for their faces. You can get creative by adding unique designs to their clothes or hats!
Once you have all the pieces cut out, it’s time to assemble. Glue the facial features onto the white circles, then attach the orange beards and green hats above. Finally, glue the completed leprechaun onto a wooden craft stick for easy handling.
Pro tip: If you want to make the puppets more durable, consider using cardstock instead of regular paper. This will help them last longer, especially if kids will be playing with them.
These paper leprechaun puppets are not just for decoration; they can also be used in storytelling or puppet shows. Encourage kids to come up with their own leprechaun tales. This makes for a fun activity that combines crafting with imaginative play!
St. Patrick’s Day Table Centerpiece
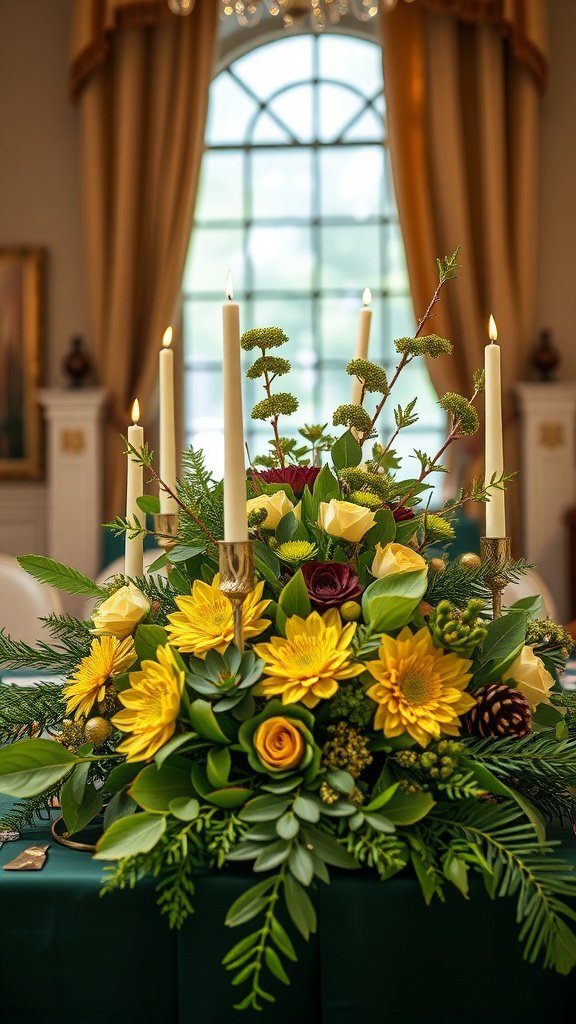
Creating a festive table centerpiece for St. Patrick’s Day is a fun way to celebrate the holiday. This craft combines vibrant colors and natural elements to bring a touch of spring indoors.
To get started, here’s what you’ll need: fresh flowers like yellow daisies and roses, greenery such as ferns, gold accents like pinecones or beads, and a few tall candles for height. You’ll also need a sturdy vase or a decorative bowl to hold everything together.
Instructions: Begin by arranging the greenery in your chosen vase. This will serve as the base. Next, add in the flowers, layering them for depth. Don’t forget to include the gold accents to enhance the festive feel. Finally, place the candles around the flowers. Make sure they are secure and not too close to the blooms.
Pro tip: Use flowers that are in season for freshness and to save money. Yellow and green are great colors for St. Patrick’s Day, symbolizing the holiday’s spirit.
Once your centerpiece is ready, place it in the center of your dining table. Light the candles just before your guests arrive for a warm and inviting atmosphere!
Recycled Green Bottle Planters
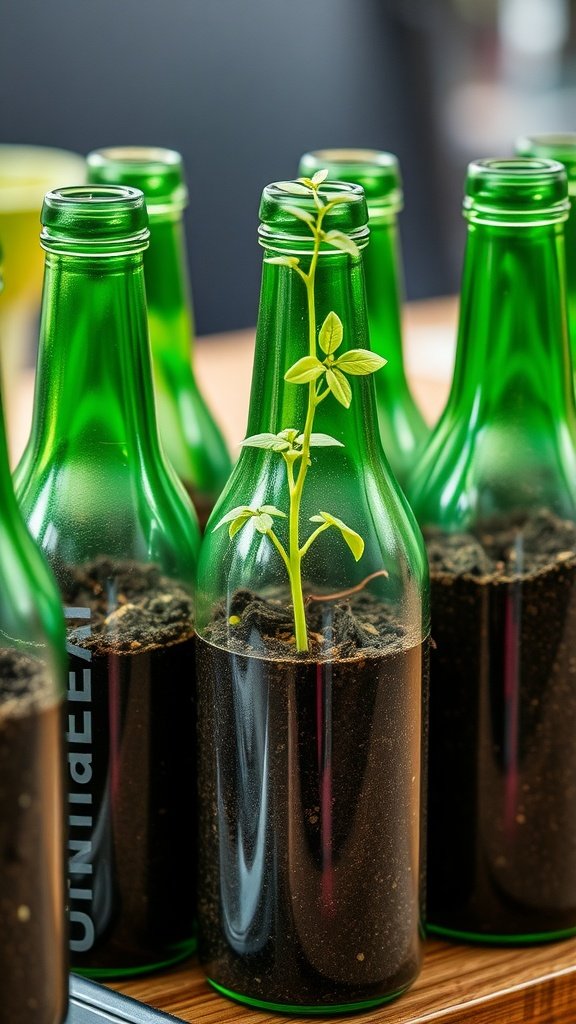
St. Patrick’s Day crafts are a fun way to celebrate without breaking the bank. One charming project is creating recycled green bottle planters. These unique planters give a nod to the holiday’s color theme while being eco-friendly.
To get started, you’ll need: some empty green bottles, soil, and small plants or seeds. Make sure to clean the bottles thoroughly. You can use any green glass bottles; they add a festive touch that complements your St. Patrick’s Day decor.
Instructions are simple. First, cut the bottles in half. If you prefer a more rustic look, leave them whole and just remove the tops. Next, fill the bottom half with soil. Create a small hole for your plant or seeds and gently place them in the soil, covering them lightly. Finally, water your new green planters and place them in a sunny spot.
Pro tip: If you’re using the whole bottle, consider placing decorative stones or pebbles at the bottom for drainage. This will keep your plants healthy and thriving!
St. Patrick’s Day Tinsel Garland
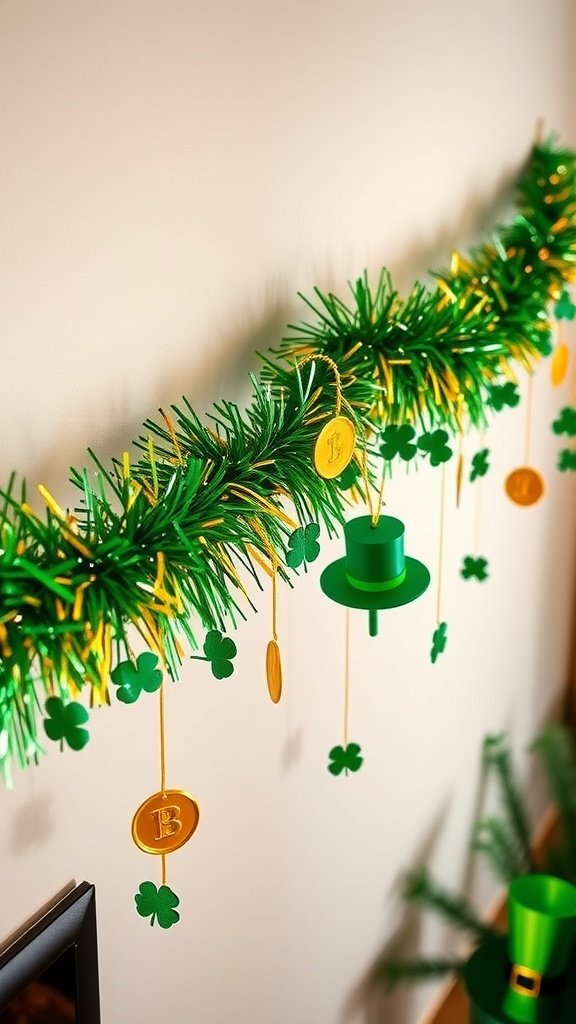
Creating a St. Patrick’s Day tinsel garland is a fun and festive way to decorate your space. This garland, made with shiny green tinsel, adds a cheerful touch to your home. Perfect for hanging over doorways, tables, or along walls, it instantly brings the spirit of the holiday right into your living room.
To make this garland, you only need a few simple materials. Gather some green and gold tinsel garland, scissors, and string or tape. The shiny texture of the tinsel mimics the sparkle of a pot of gold, making it a great addition to your St. Patrick’s Day crafts.
Shamrock Painted Rocks

Shamrock painted rocks are a delightful way to celebrate St. Patrick’s Day while getting creative. These charming decorations can bring a touch of Irish spirit to your home or garden. They are easy to make and perfect for all ages, making them a fun craft for families and friends to enjoy together.
To create your own shamrock rocks, you’ll need a few simple supplies. Gather some smooth, clean rocks, green and white paint, paintbrushes, and a sealant to protect your artwork. You can find rocks in your backyard or at a local craft store. This project is not just about painting; it’s also a great way to connect with nature and express your creativity.
Felt Rainbow Banners
Felt rainbow banners are a delightful addition to any St. Patrick’s Day celebration. They bring color and cheer to your home, instantly transforming the atmosphere. The combination of rainbows and shamrocks creates a festive vibe that’s perfect for the occasion.
To create these banners, you’ll need some simple materials. Gather colored felt sheets in bright rainbow hues, green felt for the shamrocks, scissors, a glue gun, and string or twine for hanging. These supplies are easily found at craft stores or online.
Instructions: Here’s how to make your own felt rainbow banners. Start by cutting out rainbow arcs from the colored felt. You can make each arc a different color, stacking them on top of each other. Next, cut out shamrocks and any other desired shapes. Use the glue gun to attach the felt pieces securely.
Once your pieces are ready, it’s time to assemble the banner. Lay them out on the string or twine, spacing them evenly. Secure each piece with a little more glue and then hang your banner in a fun spot—maybe across a window or above a table. It’s a simple project that adds a personal touch to your St. Patrick’s Day crafts.
Pro tip: If you want your banner to last beyond St. Patrick’s Day, consider adding a layer of fabric stiffener to the felt. This will help it hold its shape and make it more durable. Plus, you can reuse it for other celebrations by simply changing the colors!
Pot of Gold Candy Bags

St. Patrick’s Day is all about fun and creativity, and what better way to celebrate than with some delightful Pot of Gold Candy Bags? These cute little bags capture the spirit of the holiday and add a sweet touch to your festivities. They’re easy to make and can brighten anyone’s day!
What is needed:
- Small clear treat bags
- Gold foil chocolate coins
- Green and yellow candy (like jelly beans or chocolate buttons)
- Ribbon or twine for tying
- Optional: Printable tags to add a personal touch
Instructions:
- Start by filling each treat bag with a layer of gold foil chocolate coins.
- Add a few green and yellow candies on top of the coins to create a vibrant look.
- Seal the bags tightly and tie them with a ribbon or twine to keep everything secure.
- If you want, attach a cute tag that says, ‘Happy St. Patrick’s Day!’ for that extra flair.
Pro tips:
- Mix different types of candies for a colorful surprise!
- Consider making a few extra bags to share with neighbors or friends.
- These bags also make great party favors for any St. Patrick’s Day gathering.
St. Patrick’s Day Coloring Pages
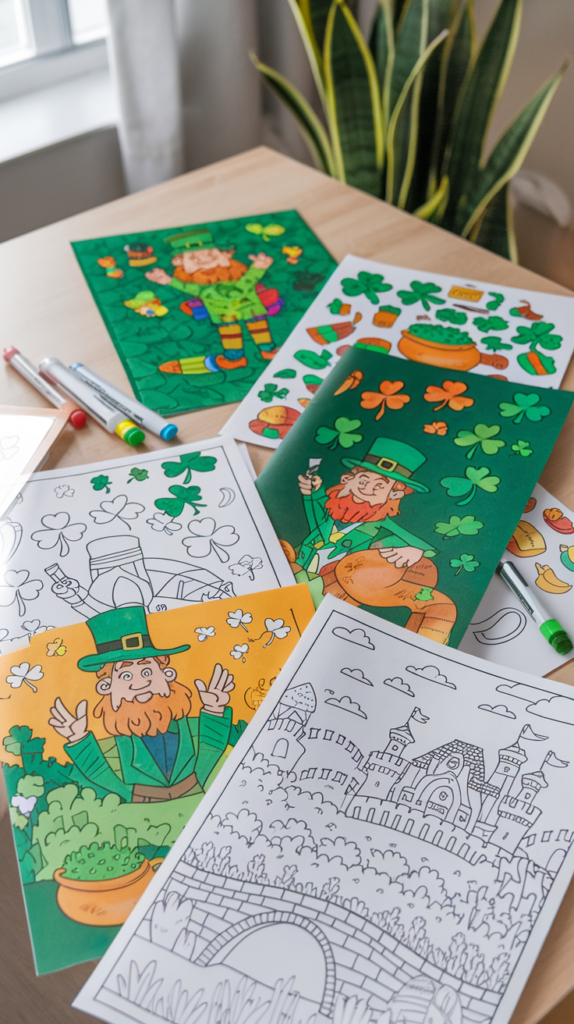
St. Patrick’s Day coloring pages are a fun way to celebrate the holiday and get creative. The image shows a collection of coloring sheets featuring clovers, rainbows, and festive designs. These pages invite kids and adults alike to add their own splash of color, making them perfect for family activities.
What is needed for this craft? You will need printed coloring pages, colored pencils or crayons, and perhaps some fun decorations like stickers to personalize your artwork. If you want to add an extra touch, consider using glitter or markers for highlights!
Instructions are simple. Start by printing out the St. Patrick’s Day coloring pages. Gather your colored pencils or crayons, and find a cozy spot to color. Choose your favorite page and let your imagination run wild. Don’t worry about perfection—just enjoy the process!
Pro tips: If you want to make your coloring experience even more enjoyable, play some Irish music in the background. You could also share your pages with family and friends for a fun coloring party. Lastly, display your finished art around the house to bring some festive cheer!
DIY Beaded Shamrock Keychains
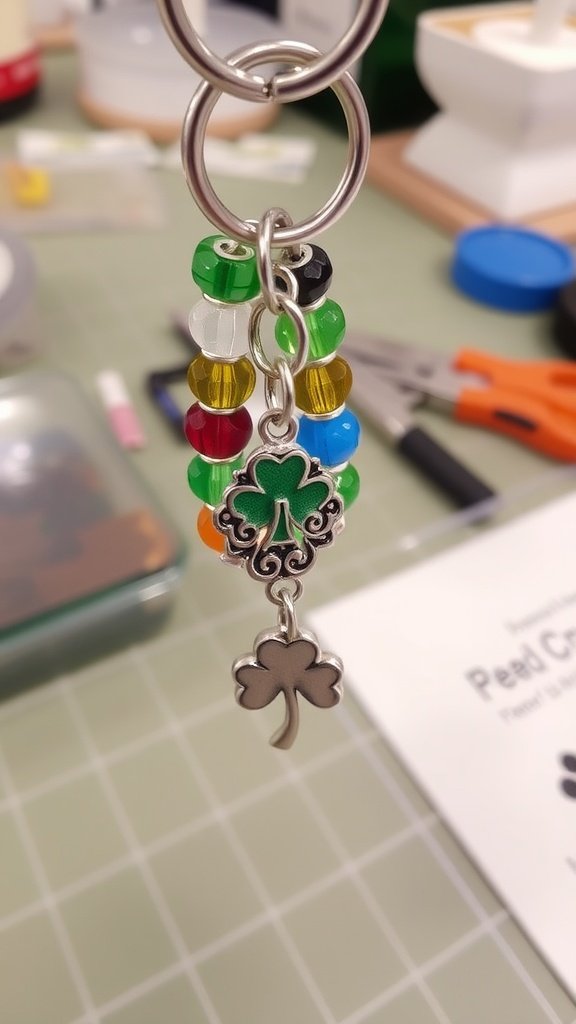
St. Patrick’s Day crafts are a fun way to celebrate the holiday, and making beaded shamrock keychains is a simple and enjoyable project. These colorful keychains can brighten up your keys or backpack, making them a perfect accessory for the occasion.
To create your own beaded shamrock keychains, you’ll need a few basic materials. Gather some green beads, colorful accent beads, keychain rings, and a couple of shamrock charms. The bright colors combined with the green shamrocks will make your keychains pop!
Here’s how to make them: First, cut a length of string or wire. Add a few colorful beads at the top, then slide on the shamrock charm. Follow it up with more beads to create a fun pattern. Finally, attach everything to a keychain ring. Ensure to secure the ends well so everything stays in place.
Pro Tip: Mix different shapes and sizes of beads for added texture. You can even personalize each keychain by using initials or other charms. These little details make your crafts truly special!
Green Tie-Dye T-Shirts

Green tie-dye t-shirts are a fun and creative way to celebrate St. Patrick’s Day. They add a splash of color and a personal touch to any festive outfit. Plus, making these shirts can be a great activity for families or friends to enjoy together.
To create your own green tie-dye t-shirts, here’s what you will need:
- White cotton t-shirts
- Green tie-dye kit
- Rubber bands
- Plastic squeeze bottles (if not included in the kit)
- Plastic gloves
- Plastic table cover (for easy cleanup)
- Water
- Plastic wrap
Now, let’s dive into the instructions:
- First, lay out your plastic table cover to protect your workspace. Put on the gloves to keep your hands clean.
- Twist or fold the t-shirt to create your desired tie-dye pattern. Using rubber bands, secure the shirt in place. The tighter you secure it, the more defined the pattern will be.
- Prepare the dye according to the instructions in your tie-dye kit. Fill the squeeze bottles with dye, mixing different shades of green if you like.
- Apply the dye to the shirt, making sure to cover all sections. Be creative with your design! You can even add different shades for a unique look.
- Once you’re happy with the dye application, wrap the shirt in plastic wrap. This helps the dye set better.
- Let the shirt sit for 6-8 hours or overnight for the best results. After that, rinse it out in cold water until the water runs clear.
- Finally, wash the shirt in cold water and let it air dry.
Pro Tip: If you want to create a more intricate design, try folding the shirt in different shapes or using multiple colors. Always remember to read the dye kit instructions for the best results.
Lucky Charm Friendship Bracelets
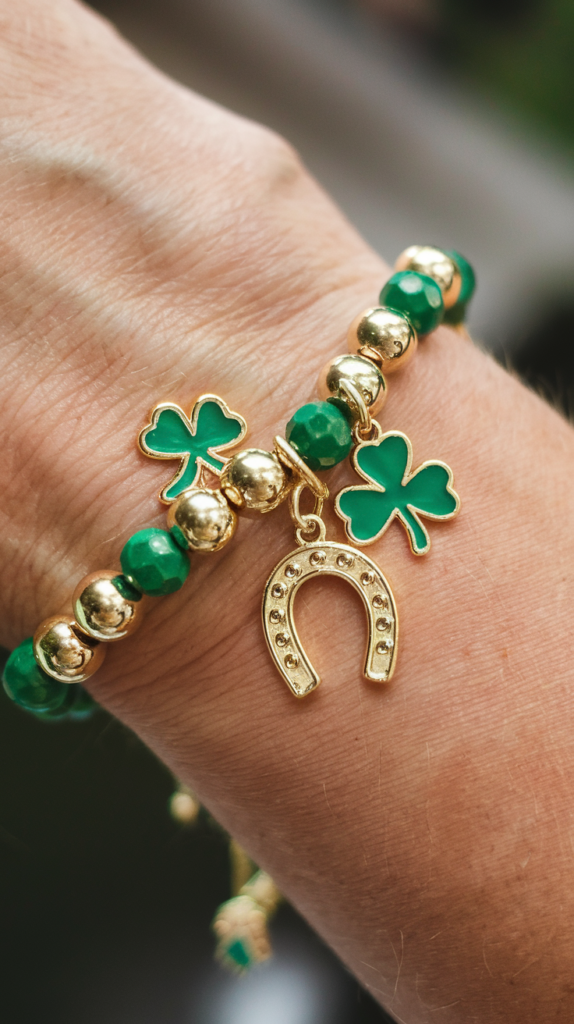
St. Patrick’s Day is all about celebrating luck and friendship, and what better way to do that than with some vibrant Lucky Charm Friendship Bracelets? These fun crafts are not only a great way to get creative, but they also make perfect gifts for your friends. Using cheerful green beads and gold accents, these bracelets embody the spirit of the holiday!
What is needed: You will require elastic string, a variety of green beads, gold spacer beads, and scissors. If you want to add a special touch, consider using charms that symbolize luck, like four-leaf clovers or horseshoes.
Instructions: First, cut a piece of elastic string about 12 inches long. Then, start stringing your beads in a pattern that you like; mix the green and gold beads for a balanced look. Once you’re happy with your design, tie the ends of the elastic string together securely. Make sure the bracelet fits comfortably on your wrist before trimming any excess string.
Pro tips:To prevent the beads from slipping, you can add a drop of clear nail polish on the knot after tying it. This will help keep everything in place. You can also create matching bracelets with your friends, so you all have a little piece of luck with you!
St. Patrick’s Day Photo Booth Props
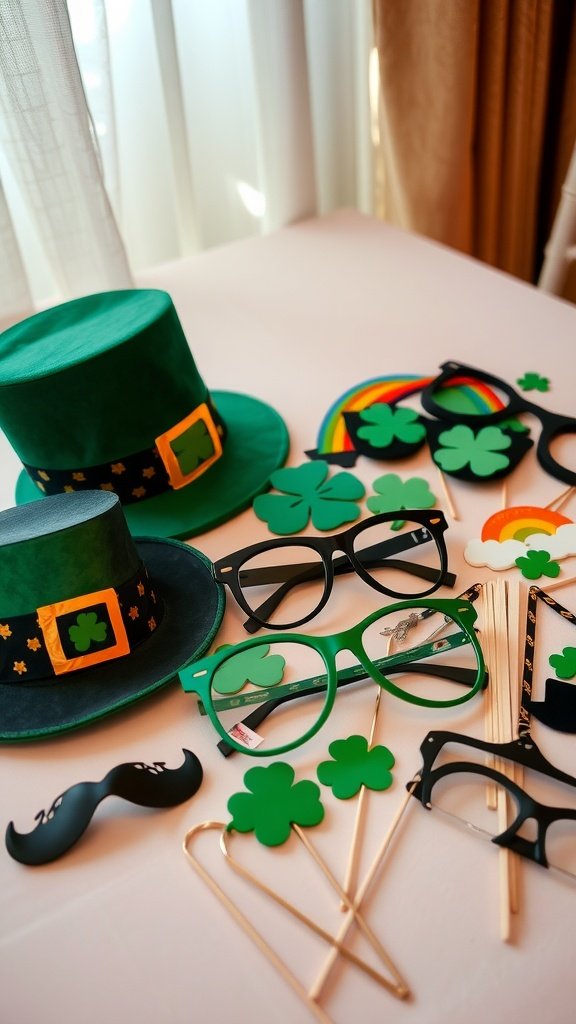
If you’re gearing up for some festive fun this St. Patrick’s Day, photo booth props are a must to add a splash of cheer to your celebrations. The image showcases some vibrant green hats and quirky glasses that capture the spirit of the holiday perfectly.
To create your own St. Patrick’s Day photo booth props, you will need a few simple items. Gather green cardstock, scissors, glue, and any decorative elements like glitter or shamrock stickers. You can even use old cardboard to create fun shapes like hats or pipes.
Instructions: Start by cutting out your desired shapes from the cardstock. If you’re making hats, refer to the image for inspiration. Use glue to attach decorations, and let them dry thoroughly. For the glasses, you can use a template to cut out frames and attach them to a stick for easy handling.
Pro Tip: To make your props even more fun, incorporate phrases like ‘Kiss Me, I’m Irish!’ or ‘Lucky Charm’ on your signs for added flair. These little touches will definitely make for memorable pictures!
Glittery Shamrock Bookmarks
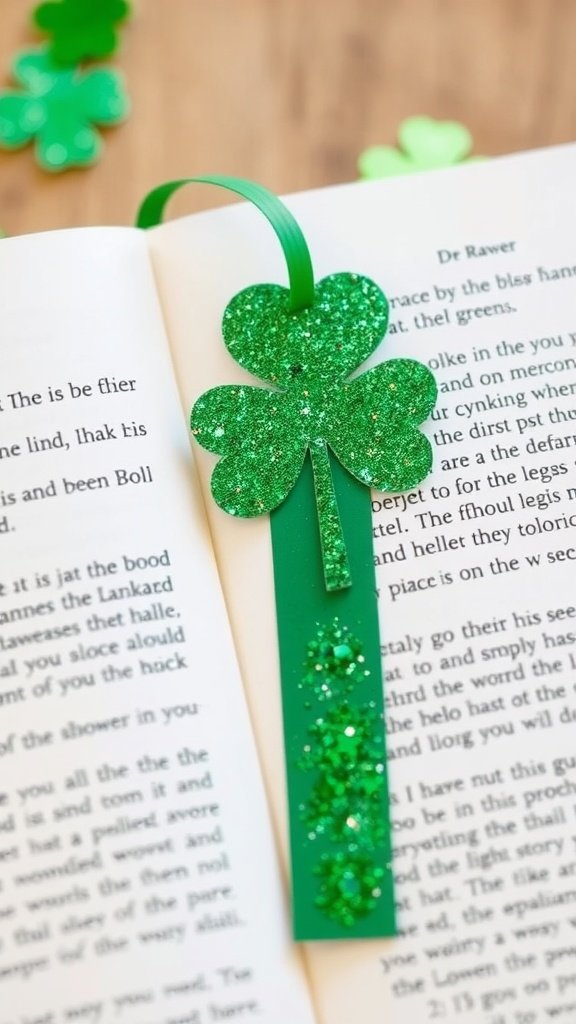
Looking for a fun way to celebrate St. Patrick’s Day? These glittery shamrock bookmarks are a delightful craft that adds a festive touch to your reading. They are easy to make and perfect for keeping your place in the book while enjoying the seasonal spirit!
To create these bookmarks, you’ll need just a few simple materials. Gather some green cardstock, scissors, glue, and glitter. You can also use a marker for added details. The glitter will give your bookmarks that eye-catching shine!
Here’s how to make them: Start by cutting out shamrock shapes from the green cardstock. Aim for different sizes to make a fun set. Once you have your shapes, glue a generous amount of glitter on top for that sparkle. After the glue has dried, attach a thin ribbon or string to the bottom to make it easy to find your place in your books. Voila! You have charming bookmarks!
Pro tip: If you want to add a personal touch, use a marker to write a quote or a little note on the bookmark. This makes it a thoughtful gift for friends or family who enjoy reading. You can also experiment with different colors of glitter to match your favorite book covers!
Green Yarn Pom-Poms

Green yarn pom-poms are a fun and easy craft for St. Patrick’s Day. They add a pop of color and can be used in various decorations. Whether you’re making a festive garland or just some cute accents, these pom-poms are the way to go.
What is Needed:For this craft, you will need green yarn (various shades can be fun), scissors, and a fork or pom-pom maker. If you want to add some sparkle, consider glitter or sequins for embellishment.
Instructions:Start by wrapping the yarn around the fork or pom-pom maker about 50 times. The more you wrap, the fluffier your pom-pom will be. Once you’ve wrapped enough, carefully slide the yarn off the fork and tie a piece of yarn tightly around the center. Trim the loops to create a fluffy ball. Repeat this until you have a bunch of pom-poms!
Pro Tips:Try mixing different shades of green for a fun effect. If you want even fluffier pom-poms, use a thicker yarn and don’t be afraid to trim them to your desired shape. These pom-poms can be strung together to create a beautiful garland, or you can attach them to gift packages for a festive touch.
Have fun with the family making your St Patrick’s Day crafts, or make them to give to your friends and families as gifts. Happy St Patrick’s Day!