Get ready to hop into some fun with easy dollar store crafts for Easter! Whether you’re looking to create festive decorations or DIY gifts, these budget-friendly ideas are perfect for adding a personal touch to your celebrations. Let’s jump right into crafting with items you can snag at Dollar Tree!
1. Dollar Tree Easter Crafts: DIY Easter Egg Hunt Bags

Easter egg hunts are a beloved tradition, and what better way to collect those colorful eggs than with DIY Easter egg hunt bags? Using simple supplies from Dollar Tree, you can create personalized bags that are both fun and functional.
These bags can be customized for each child, adding a special touch to the hunt. They’re also a great way to engage in dollar tree easter crafts for kids, sparking creativity and excitement.
Make Easter extra special with these adorable DIY Easter Egg Hunt Bags using supplies from Dollar Tree! These personalized bags are perfect for kids to collect their Easter eggs in style.
What You Need
(All items can be found at Dollar Tree)
✅ Small tote bags (fabric, paper, or gift bags)
✅ Easter-themed stickers, foam shapes, or stencils
✅ Acrylic paint or fabric markers
✅ Paintbrushes or sponges
✅ Ribbon or twine (optional)
✅ Hot glue gun (or fabric glue for fabric bags)
✅ Scissors
Instructions to Make It
- Prepare Your Workspace – Lay down newspaper or a plastic table cover to avoid messes. Gather all your supplies.
- Design Your Bag – Plan your design before starting. You can go with classic bunnies, eggs, or spring flowers!
- Decorate with Stickers & Foam Shapes – Use Easter-themed foam shapes or stickers to create a cute design on the bag. If using stencils, tape them in place before painting.
- Paint or Draw Details – Use acrylic paint or fabric markers to add details like a name, polka dots, or cute Easter designs. Let it dry completely.
- Attach Ribbon or Twine – If desired, tie a colorful ribbon or twine to the handles for extra flair.
- Let It Dry & Enjoy! – Allow everything to dry fully before using the bag for the egg hunt.
Pro Tips
✔️ Personalize It – Add each child’s name with a paint pen or glitter glue to make it extra special!
✔️ Use Fabric Bags for Durability – They last longer and can be reused every Easter.
✔️ Layer Stickers & Paint for Dimension – This adds a fun 3D effect to your designs.
✔️ Seal with Mod Podge (for fabric bags) – This keeps the decorations from peeling over time.
These budget-friendly Easter Egg Hunt Bags are fun to make and will bring extra excitement to your Easter celebrations. Let the creativity shine, and happy crafting!
2. Dollar Tree Easter Crafts: DIY Charming Mason Jar Lanterns
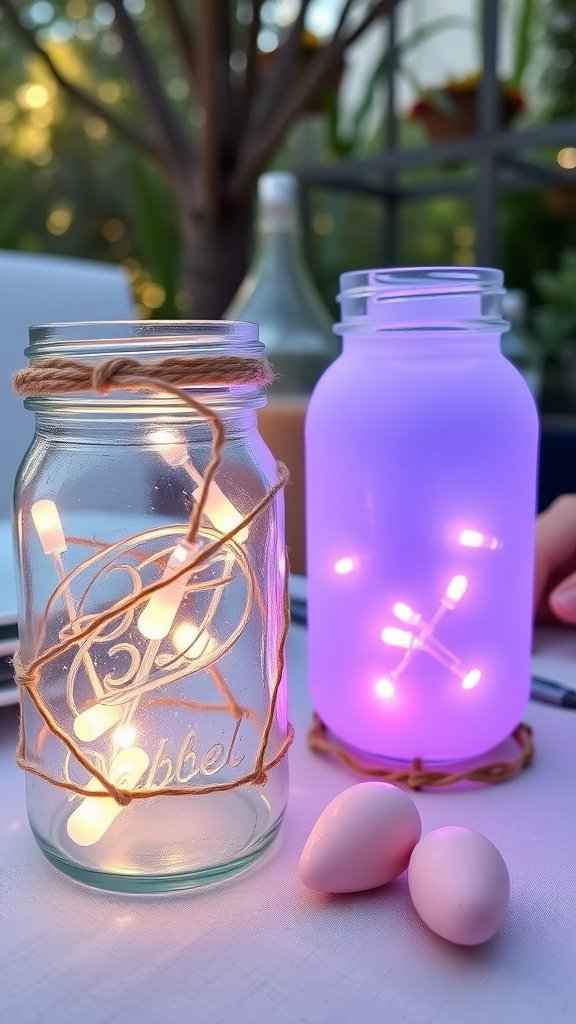
Mason jar lanterns are a delightful addition to any Easter celebration. They bring a soft glow and a touch of charm to your decor, making them perfect for spring gatherings or even as a centerpiece. These lanterns can be easily customized to fit your personal style and can brighten up any space.
For this Dollar Tree Easter crafts DIY, you can create lanterns that reflect the spirit of the season. Adding fairy lights inside the jars enhances the ambiance, making them beautiful decorations for Easter brunch or evening celebrations.
Light up your Easter celebrations with these charming DIY Mason Jar Lanterns made with affordable Dollar Tree supplies! These glowing decorations add a cozy and festive touch to any space.
What You Need
✅ Mason jars (glass or plastic)
✅ Acrylic paint or Mod Podge with tissue paper
✅ Paintbrushes or sponges
✅ Battery-operated tea lights
✅ Easter-themed stickers, stencils, or decals
✅ Twine, ribbon, or raffia (optional)
✅ Hot glue gun (optional for embellishments)
✅ Scissors
Instructions to Make It
- Clean the Mason Jar – Wash and dry the jar to ensure paint or Mod Podge sticks properly.
- Choose a Design – Decide whether you want a frosted look with paint, a stained glass effect with tissue paper, or a stencil design.
- Paint or Apply Tissue Paper – For a frosted effect, use light pastel acrylic paint and dab with a sponge. For a stained glass look, brush Mod Podge onto the jar, stick on torn tissue paper, and seal with another Mod Podge layer.
- Add Stickers or Stencils – Once dry, place Easter-themed stickers or use stencils to create bunny, egg, or floral patterns. You can also use metallic markers to draw designs.
- Wrap the Rim – Tie twine, ribbon, or raffia around the top of the jar for a rustic touch. Secure with a dab of hot glue if needed.
- Insert the Tea Light – Place a battery-operated tea light inside the jar and turn it on for a beautiful glowing effect.
Pro Tips
✔️ Mix Colors for a Gradient Look – Blending pastel paints creates a soft ombré effect.
✔️ Use Glass Paint for a More Stained Glass Look – This gives a smooth, translucent finish.
✔️ Make a Hanging Lantern – Wrap wire around the jar’s rim to create a handle and hang it outside.
✔️ Group Different Sizes Together – Displaying multiple jars in varying heights adds charm to your Easter décor.
These DIY Mason Jar Lanterns are an easy and festive way to brighten up your Easter celebrations. Whether used as table centerpieces or porch decorations, they’re sure to add a warm and magical touch. Happy crafting!
3. Dollar Tree Easter Crafts: DIY Painted Rock Easter Decorations
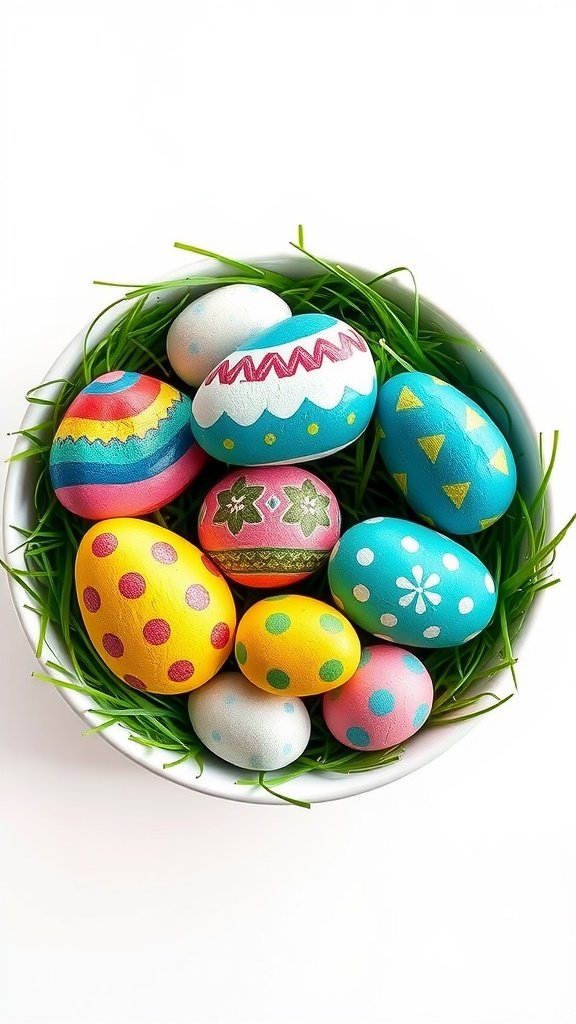
Adding a splash of color to your Easter celebrations is easy with painted rock decorations. These delightful pieces can brighten up your home and bring a festive spirit to your gathering. With a few simple supplies, you can create beautiful decorations that are perfect for display or for hiding around your yard for an Easter egg hunt.
Get creative this Easter with DIY Painted Rock Easter Decorations! These adorable and budget-friendly decorations are perfect for adding a festive touch to your home or garden. Plus, they make great keepsakes or fun Easter hunt surprises!
What You Need
✅ Smooth rocks (found at Dollar Tree or in nature)
✅ Acrylic paint in pastel and bright Easter colors
✅ Paintbrushes and fine-tip paint pens
✅ Mod Podge or clear sealant spray
✅ Easter-themed stencils (optional)
✅ Paper towel or newspaper (to protect your workspace)
Instructions to Make It
- Prepare the Rocks – Wash and dry the rocks thoroughly to remove any dirt or dust.
- Choose Your Designs – Plan your Easter-themed designs such as bunnies, chicks, Easter eggs, crosses, or floral patterns.
- Paint the Base Color – Apply a solid base coat in pastel colors like pink, blue, yellow, or lavender. Let it dry completely before adding details.
- Add Designs & Details – Use fine-tip paint pens or small brushes to draw patterns, faces, or decorative elements. If using stencils, secure them in place and paint over them carefully.
- Seal the Design – Once the paint is fully dry, apply a layer of Mod Podge or spray with a clear sealant to protect the artwork from chipping or fading.
- Display & Enjoy! – Place your painted rocks in Easter baskets, on the table as centerpieces, or outside in the garden for a festive touch.
Pro Tips
✔️ Use a White Base for Brighter Colors – Painting a thin layer of white before adding color helps make pastels pop.
✔️ Try Dot Painting for Fun Patterns – Use the tip of a brush or a cotton swab to create cute dotted designs on eggs or flowers.
✔️ Make Story Stones for Kids – Paint different Easter characters and let kids create a fun storytelling activity with them.
✔️ Use Glow-in-the-Dark Paint – Add a magical touch by painting details with glow-in-the-dark paint for a nighttime surprise!
These DIY Painted Rock Easter Decorations are a fun and creative way to bring festive cheer to your home. Whether you use them for décor, gifts, or an Easter egg hunt alternative, they’re sure to bring smiles this season. Happy crafting!
4. Dollar Tree Easter Crafts: DIY Bunny Garland
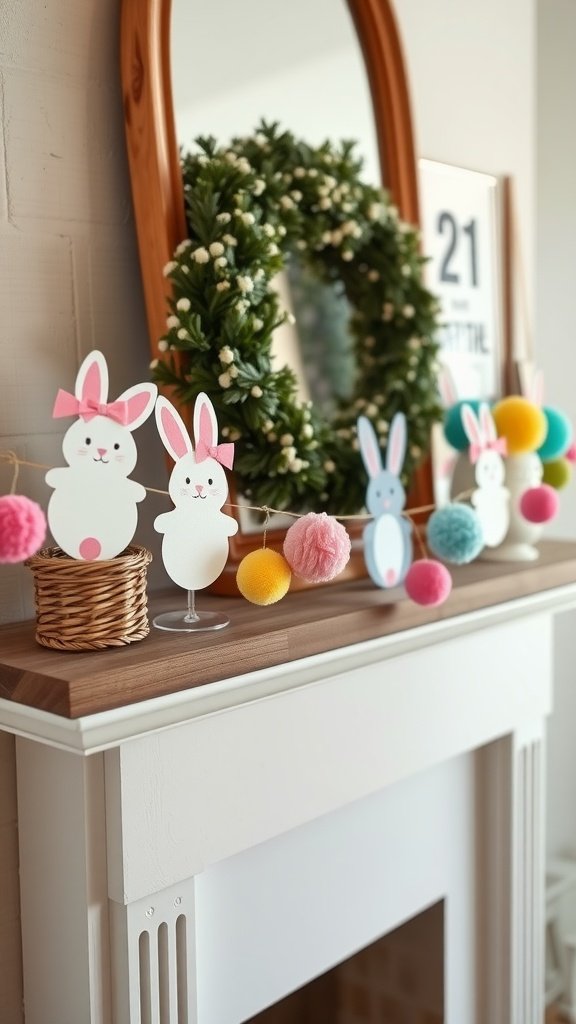
If you’re looking to spruce up your home with some cheerful decor, this DIY Bunny Garland is a lovely option. Created with simple items from Dollar Tree, it’s perfect for your Easter celebrations. Plus, it’s a fun activity for kids!
Decorate your home for Easter with a charming DIY Bunny Garland made using affordable Dollar Tree supplies! This easy and festive craft adds a whimsical touch to mantels, doorways, or walls.
What You Need
✅ Colored cardstock or felt (pastel colors work best)
✅ Bunny template (printable or freehand)
✅ Scissors
✅ Cotton balls or pom-poms (for tails)
✅ Hole punch
✅ Twine, ribbon, or yarn
✅ Hot glue gun or craft glue
Instructions to Make It
- Create Your Bunny Cutouts – Print or draw a simple bunny shape on cardstock or felt. Cut out as many as you need for your garland.
- Add the Fluffy Tail – Glue a cotton ball or pom-pom onto the lower part of each bunny to create a cute tail.
- Punch Holes for Hanging – Use a hole punch to make small holes in the ears of each bunny cutout. If using felt, carefully poke holes with scissors.
- Thread the Garland – String twine, ribbon, or yarn through the holes, spacing out the bunnies evenly.
- Hang & Enjoy – Drape your bunny garland over a mantel, wall, doorway, or even a dessert table for a festive Easter touch!
Pro Tips
✔️ Use Patterned Scrapbook Paper for Extra Charm – Polka dots, florals, or gingham add a fun, festive vibe.
✔️ Make It Reversible – Decorate both sides of the bunnies so they look great from any angle.
✔️ Add Beads or Mini Carrots – String small wooden beads or tiny carrot decorations between the bunnies for extra flair.
✔️ Laminate for Durability – If using paper, laminate the bunnies so you can reuse the garland each year.
This DIY Bunny Garland is an adorable and budget-friendly way to bring Easter cheer into your home. Whether you’re decorating for a party or just adding seasonal charm, this craft is a must-try!
5. Dollar Tree Easter Crafts: DIY Colorful Egg Wreath Decoration

Create a cheerful atmosphere this Easter with a colorful egg wreath that adds a pop of color to your home. This decoration is not just eye-catching; it’s also a fun project for anyone looking to try their hand at some dollar tree easter crafts DIY.
Brighten up your front door or Easter decor with this fun and easy DIY Colorful Egg Wreath using Dollar Tree supplies! This vibrant wreath is perfect for welcoming spring and adding a festive touch to your home.
What You Need
✅ Wire wreath form or foam wreath ring
✅ Plastic Easter eggs (various colors)
✅ Hot glue gun and glue sticks
✅ Artificial flowers, greenery, or ribbon (optional)
✅ Decorative Easter grass or shredded paper (optional)
✅ Scissors
Instructions to Make It
- Prepare Your Base – If using a wire wreath form, wrap it with ribbon or Easter grass to create a fuller look. If using a foam wreath, you can paint it to match your color theme.
- Arrange the Eggs – Before gluing, lay out the plastic Easter eggs around the wreath to plan your design. Mix and match colors for a fun, vibrant look.
- Glue the Eggs in Place – Using a hot glue gun, attach the eggs securely to the wreath form. Start with the outer edge, then fill in the center to create a layered effect.
- Add Decorative Touches – Attach artificial flowers, greenery, or bows to fill any gaps and add extra charm. You can also glue in bits of shredded paper for a festive touch.
- Attach a Hanging Loop – Tie a ribbon or loop of twine to the top of the wreath for easy hanging.
- Hang & Enjoy! – Display your Colorful Egg Wreath on your front door, mantel, or wall to spread Easter cheer!
Pro Tips
✔️ Use Different Egg Sizes – Mix small and large eggs for a more dynamic, layered look.
✔️ Create a Monochrome or Pastel Theme – Stick to one color family for a stylish, modern wreath.
✔️ Secure the Eggs Well – If displaying outdoors, use extra glue or floral wire to keep everything in place.
✔️ Add Battery-Operated Fairy Lights – Wrap tiny string lights around the wreath for an extra magical touch.
This DIY Colorful Egg Wreath is a simple yet stunning way to decorate for Easter, and the best part is, it’s completely customizable! Get creative with colors and embellishments to match your style. Happy crafting!
6. Dollar Tree Easter Crafts: DIY Floral Bunny Centerpiece
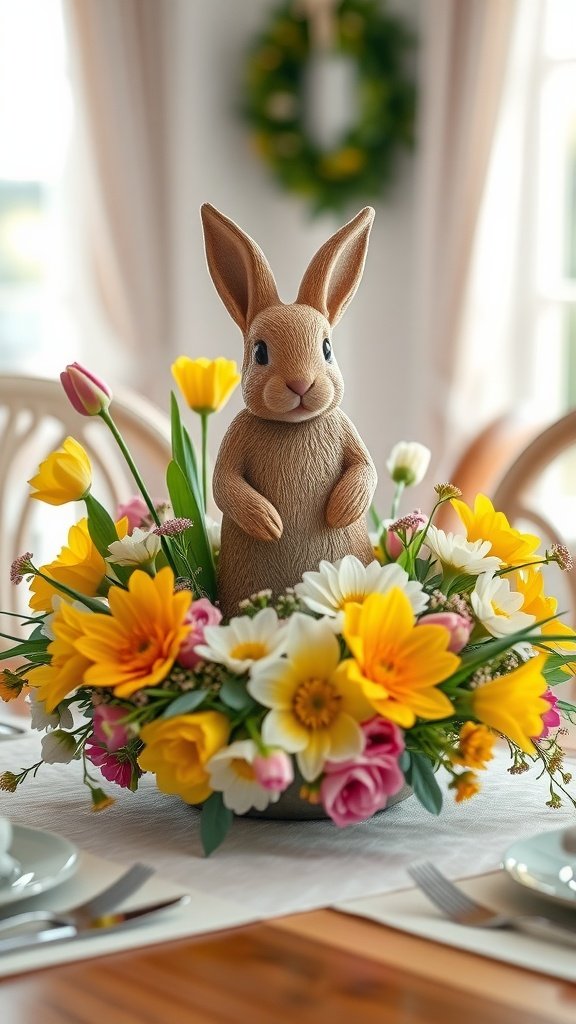
If you’re looking to brighten up your Easter table, a Floral Bunny Centerpiece is a fun and simple idea! This craft combines the charm of spring flowers with a cute bunny figure, making it a delightful decoration for any Easter gathering.
Create a stunning Floral Bunny Centerpiece for your Easter table using budget-friendly Dollar Tree supplies! This elegant yet whimsical decoration is perfect for adding a festive and spring-inspired touch to your home.
What You Need
✅ Foam bunny shape or plush bunny (Dollar Tree often carries both)
✅ Artificial flowers (spring colors like pastel pink, lavender, yellow, and white)
✅ Floral foam or small vase (if using a freestanding bunny)
✅ Hot glue gun and glue sticks
✅ Ribbon or twine (optional)
✅ Scissors or wire cutters
Instructions to Make It
- Prepare the Bunny – If using a foam bunny, remove any tags and set it in place. If using a plush bunny, make sure it can stand upright or lean securely against the floral arrangement.
- Arrange the Flowers – Trim artificial flowers with wire cutters and push them into the floral foam or small vase. Arrange them in a full, rounded shape, mixing colors for a balanced look.
- Attach the Bunny – Secure the bunny in the center of the floral arrangement using hot glue or by nestling it into the foam.
- Add Extra Details – Tie a ribbon around the bunny’s neck for a cute touch, or weave small greenery pieces around the base of the arrangement.
- Final Touches – Adjust the flowers and bunny to make sure everything looks balanced and full.
- Display & Enjoy! – Place your Floral Bunny Centerpiece on the dining table, mantel, or entryway for a gorgeous Easter display.
Pro Tips
✔️ Use a Wire Bunny Frame for a Chic Look – Wrap artificial flowers around a wire bunny frame for a more modern and minimalistic design.
✔️ Mix Different Flower Textures – Combine roses, daisies, and baby’s breath for a more natural, high-end look.
✔️ Incorporate Easter Eggs – Add small pastel eggs nestled among the flowers for extra festive charm.
✔️ Use a Cake Stand for Elevation – Placing the centerpiece on a cake stand makes it stand out beautifully on your table.
This DIY Floral Bunny Centerpiece is an easy and elegant way to bring the beauty of spring and Easter into your home. Whether for a family gathering or just to brighten up your space, this charming craft is sure to impress. Happy crafting!
7. Dollar Tree Easter Crafts: DIY Egg Carton Chicks
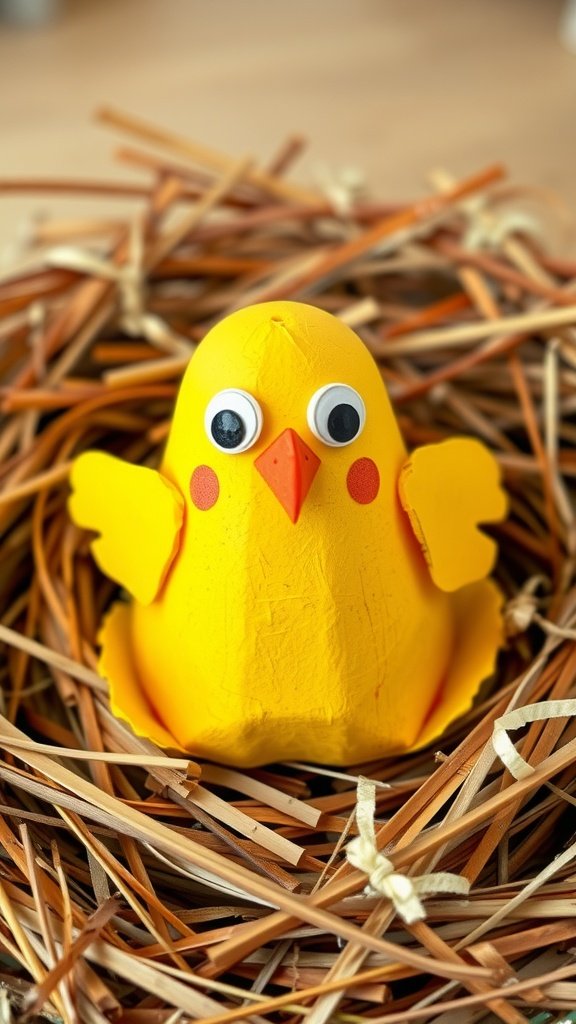
Egg carton chicks are a fun and creative project for Easter, making them perfect for your Dollar Tree Easter crafts decor. These cute little chicks can brighten up any space and are a fantastic way to involve kids in the festivities. Plus, they are easy to make with items you can find at Dollar Tree!
Turn recycled egg cartons into adorable DIY Egg Carton Chicks for a fun and budget-friendly Easter craft! This simple project is perfect for kids and adds a cute touch to Easter decorations or baskets.
What You Need
✅ Cardboard egg carton (cut into individual cups)
✅ Yellow acrylic paint or spray paint
✅ Paintbrushes
✅ Googly eyes (or black marker for eyes)
✅ Orange or red cardstock (for beaks and feet)
✅ Craft feathers (optional)
✅ Glue (hot glue or craft glue)
✅ Scissors
Instructions to Make It
- Cut the Egg Carton – Carefully cut out individual egg carton cups to create the chick’s body. Trim any rough edges.
- Paint the Cups – Paint each cup yellow and let them dry completely.
- Add the Eyes – Glue on googly eyes, or draw small black circles with a marker.
- Create & Attach the Beak – Cut small triangles from orange cardstock and glue them onto the front of each cup.
- Make the Feet (Optional) – Cut out tiny feet from orange cardstock and glue them to the bottom of the chick.
- Add Feathers (Optional) – Attach a small feather to the top or back of the chick for extra fluffiness.
- Let Everything Dry & Enjoy! – Once all pieces are secure, place your cute chicks in an Easter basket or use them for festive decorations!
Pro Tips
✔️ Use Pipe Cleaners for Legs – Bend orange pipe cleaners into tiny feet and glue them underneath for a 3D effect.
✔️ Make a Hanging Garland – String multiple chicks together with twine to create an adorable Easter garland.
✔️ Use Pastel Colors for Variety – Try painting some chicks in soft pastel pinks or blues for a fun, colorful set.
✔️ Turn Them Into Egg Holders – Use the open side of the egg cup to hold mini chocolate eggs for a cute Easter table setting.
These DIY Egg Carton Chicks are a simple and fun way to recycle materials while adding a festive touch to your Easter celebrations. Perfect for kids and adults alike, this craft will bring smiles all season long. Happy crafting!
8. Dollar Tree Easter Crafts: DIY Easter Basket Gifts
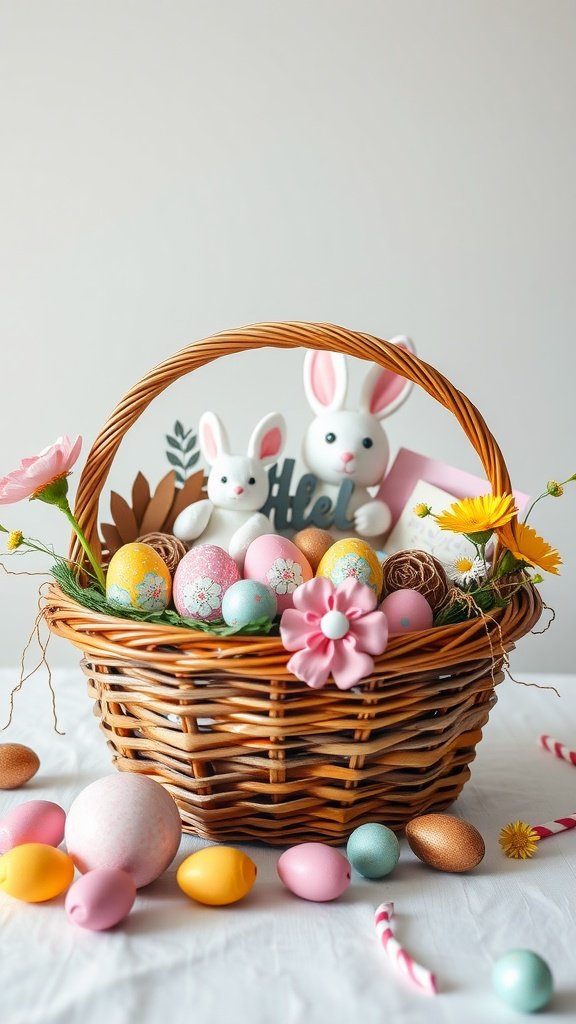
Creating delightful Easter baskets is a fun way to celebrate the holiday. Using items from Dollar Tree makes it both easy and budget-friendly. You can fill baskets with colorful eggs, cute bunnies, and cheerful decorations that the kids will love.
Create adorable and budget-friendly Easter Basket Gifts using Dollar Tree finds! Whether for kids, teens, or adults, these DIY Easter baskets are a fun way to spread Easter cheer without breaking the bank.
What You Need
✅ Small basket, bucket, or gift bag (Dollar Tree has tons of options)
✅ Easter grass or shredded paper
✅ Themed treats (chocolates, candy, or fruit snacks)
✅ Small toys or trinkets (stuffed animals, bubbles, stickers, etc.)
✅ Craft supplies (coloring books, crayons, or DIY kits)
✅ Beauty items (nail polish, lip balm, or face masks for a teen/adult basket)
✅ Mini books or activity pads
✅ Plastic eggs (fill with candy, stickers, or small surprises)
✅ Ribbon or gift wrap (optional for extra decoration)
Instructions to Make It
- Choose a Basket Theme – Decide if your basket will be for kids, teens, or adults and pick items accordingly.
- Fill with Easter Grass – Place shredded paper or Easter grass at the bottom of the basket to create a fluffy base.
- Add Larger Items First – Place the biggest items in the back so they stand out and help support the smaller items.
- Arrange Small Gifts & Treats – Add candy, toys, or beauty products in the front, filling any gaps for a full, balanced look.
- Fill Plastic Eggs with Surprises – Add a fun touch by hiding small surprises inside plastic eggs and tucking them into the basket.
- Decorate with Ribbon or Tags – Tie a ribbon around the basket handle or attach a gift tag for a festive finishing touch.
- Wrap (Optional) – If gifting, wrap the basket in cellophane and tie with a bow for a polished, store-bought look.
Pro Tips
✔️ Create a Non-Candy Basket – Include small toys, crafts, and stickers instead of sweets for a healthier alternative.
✔️ Make a Mini Spa Basket – For teens or adults, fill with face masks, bath bombs, and scented candles.
✔️ Personalize with Names – Use paint pens or stickers to add the recipient’s name to the basket for a special touch.
✔️ Go for a Color Theme – Pick a single color scheme (pastels, pinks, blues) to make the basket look extra coordinated and stylish.
These DIY Easter Basket Gifts are a fun and thoughtful way to celebrate the holiday while keeping it budget-friendly. Whether for kids, friends, or family, these baskets are sure to bring smiles this Easter!
9. Dollar Tree Easter Crafts: DIY Bunny Face Treat Bags
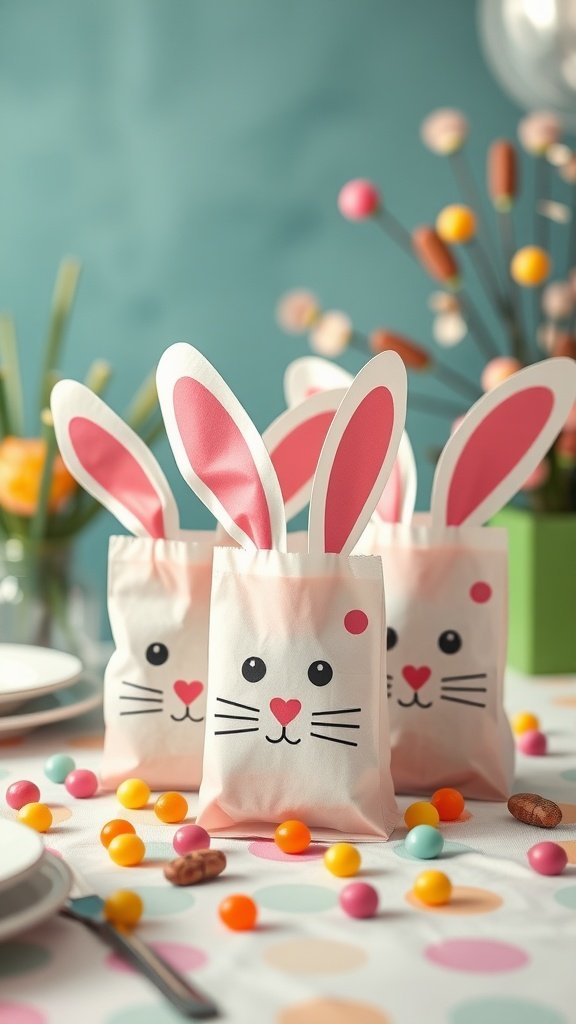
Bunny face treat bags are a fun and easy addition to your Easter celebrations. These adorable bags can hold treats for kids and make for delightful decor. Using simple supplies from Dollar Tree, you can create these charming little bags that will bring smiles to everyone.
These Bunny Face Treat Bags are an adorable and budget-friendly way to package Easter goodies! Perfect for kids’ parties, Easter baskets, or classroom gifts, this easy DIY craft adds a festive touch to your holiday treats.
What You Need
✅ White or pastel-colored paper bags (or clear treat bags)
✅ Pink and black markers or paint pens
✅ Googly eyes (optional)
✅ Cotton balls or pom-poms (for the nose)
✅ Pipe cleaners (for whiskers)
✅ Scissors
✅ Glue or tape
✅ Ribbon or twine (optional for closing the bag)
✅ Small Easter treats (chocolates, jelly beans, mini toys, etc.)
Instructions to Make It
- Prepare the Bags – If using plain paper bags, flatten them out to make decorating easier. If using clear treat bags, you can add the bunny face to a label instead.
- Draw the Bunny Face – Use black and pink markers or paint pens to draw a cute bunny face with a little nose and whiskers. You can also glue on googly eyes for extra cuteness!
- Attach the Nose & Whiskers – Glue a small pom-pom or cotton ball to the center of the face for the bunny’s nose. Cut small pipe cleaner pieces and glue them underneath for whiskers.
- Fill with Treats – Place candies, mini toys, or other small surprises inside the bag.
- Seal & Shape the Ears – If using a paper bag, pinch the top together and shape it into bunny ears by folding or cutting the corners to form points. If using clear treat bags, tie them with a ribbon to create a bunny ear effect.
- Add a Ribbon or Twine (Optional) – Tie a pastel ribbon around the top of the bag for a polished, festive look.
- Display or Gift – These Bunny Face Treat Bags are perfect for Easter baskets, party favors, or table decorations!
Pro Tips
✔️ Use Different Bag Colors – Soft pastel shades like pink, blue, or lavender make the bunnies even more fun.
✔️ Make Personalized Tags – Add a name tag to each bag for a personalized Easter gift.
✔️ Use Fabric Bags for Reusability – Draw the bunny face on a small fabric pouch for a keepsake treat bag.
✔️ Try Puffy Paint for Texture – Using puffy paint instead of markers adds a fun, 3D effect to the bunny face.
These DIY Bunny Face Treat Bags are an easy and adorable way to package Easter goodies while adding a handmade touch. Perfect for kids and adults alike, they make Easter gifting extra special. Happy crafting!
10. Dollar Tree Easter Crafts: DIY Whimsical Bunny Planters
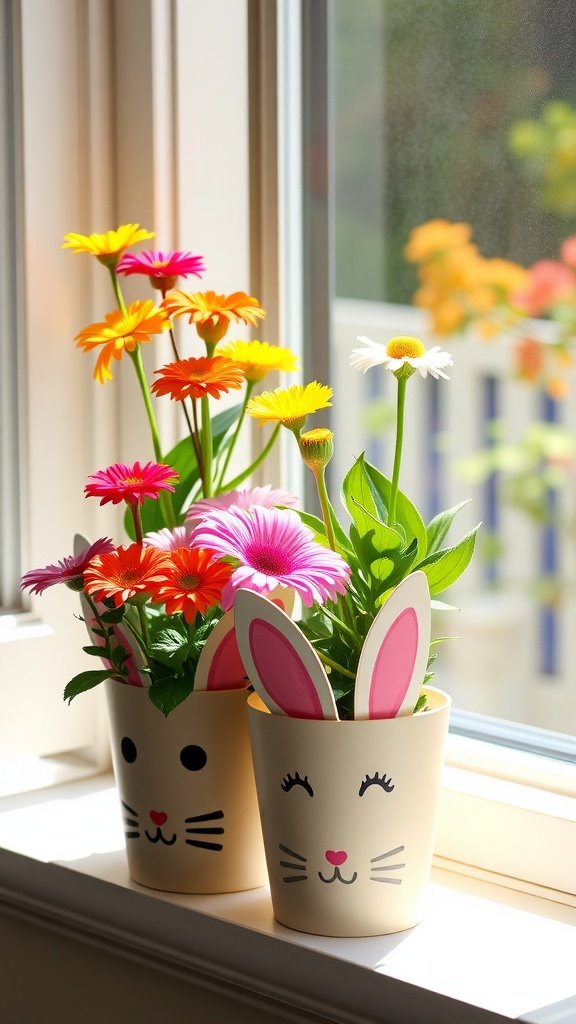
Bring a touch of cheer to your Easter decor with these adorable bunny planters. They’re a fun way to celebrate the season, and they add a lovely pop of color to any space.
Bring a touch of spring into your home with these Whimsical Bunny Planters! Made with budget-friendly Dollar Tree supplies, these adorable planters are perfect for displaying small flowers, succulents, or Easter grass.
What You Need
✅ Small flower pots (ceramic, plastic, or tin)
✅ White acrylic paint (or pastel colors)
✅ Paintbrushes or sponges
✅ Black and pink paint pens or markers
✅ Felt or cardstock (for bunny ears)
✅ Cotton balls or pom-poms (for the tail)
✅ Hot glue gun and glue sticks
✅ Small faux or real plants (succulents, flowers, or Easter grass)
✅ Scissors
Instructions to Make It
- Paint the Flower Pot – Apply a base coat of white or pastel paint to the pot. Let it dry completely.
- Draw the Bunny Face – Use a black paint pen or marker to draw a cute bunny face on one side of the pot. Add a pink nose and whiskers for extra charm.
- Create & Attach the Ears – Cut out bunny ear shapes from felt or cardstock. Glue them to the inside rim of the pot so they stand up.
- Add the Bunny Tail – Glue a small cotton ball or pom-pom to the back of the planter for a fluffy tail.
- Insert Plants or Grass – Fill the planter with a small potted plant, faux flowers, or Easter grass for a fresh spring look.
- Display & Enjoy! – Place your Whimsical Bunny Planters on a windowsill, table centerpiece, or as Easter party decorations!
Pro Tips
✔️ Use Mini Planters for Cute Gifts – Small versions make adorable party favors or teacher gifts.
✔️ Try a Chalkboard Bunny Face – Paint the pot with chalkboard paint so you can change the expressions!
✔️ Make a Hanging Bunny Pot – Attach twine to create a cute hanging planter.
✔️ Use Glow-in-the-Dark Paint – Add a fun nighttime glow by using glow-in-the-dark accents on the face.
These DIY Whimsical Bunny Planters are a fun and festive way to add springtime joy to your home. Whether you use them for real plants or as Easter decorations, they’ll bring smiles all season long. Happy crafting!
11. Dollar Tree Easter Crafts: DIY Felt Flower Egg Holders
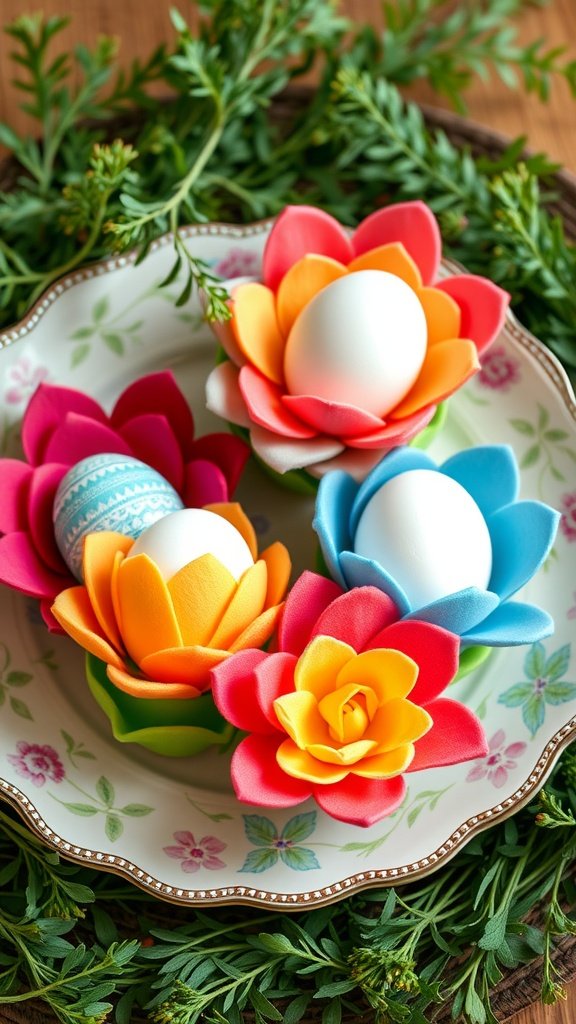
Spring is in the air, and what better way to celebrate than with some delightful Dollar Tree Easter crafts? Today, we’ll dive into creating felt flower egg holders that are not only fun to make but also add a splash of color to your Easter decor.
These charming holders are perfect for displaying Easter eggs and are a hit with kids and adults alike. With just a few materials, you can whip up some lovely decorations that will impress your guests and brighten your home. Let’s get crafting!
Give your Easter eggs a beautiful and whimsical display with these DIY Felt Flower Egg Holders! This easy and budget-friendly craft transforms simple felt into charming floral bases, perfect for holding dyed or chocolate eggs.
What You Need
✅ Felt sheets in pastel and bright colors (pink, yellow, lavender, green, etc.)
✅ Scissors
✅ Hot glue gun and glue sticks
✅ Small faux flowers or decorative buttons (optional)
✅ Plastic, dyed, or chocolate eggs
Instructions to Make It
- Cut the Flower Shapes – Using scissors, cut flower shapes from felt. You can create simple daisy shapes, tulips, or layered petals for a fuller look.
- Create the Egg Holder Base – Cut a small circle from felt, slightly larger than the bottom of an egg. This will serve as the base to support the flower.
- Layer and Glue the Flowers – Stack different layers of felt petals to create dimension. Glue the layers together, making sure to leave the center open to hold the egg.
- Attach the Base – Glue the flower onto the felt circle base, ensuring it’s sturdy enough to support an egg.
- Decorate (Optional) – Add faux flowers, small buttons, or glitter to the petals for extra charm.
- Place the Eggs & Display – Set dyed, plastic, or chocolate eggs in the holders and arrange them on your Easter table or display.
Pro Tips
✔️ Mix & Match Colors – Create a variety of flowers in different color combinations for a vibrant spring look.
✔️ Use Stiff Felt for More Structure – It helps the flower shape hold up better.
✔️ Turn It Into a Napkin Ring – Add a loop to the back so it doubles as an elegant Easter table decoration.
✔️ Make Mini Versions for Party Favors – Attach small name tags to each for a personalized touch.
These DIY Felt Flower Egg Holders are a simple yet stunning way to display Easter eggs, adding a handmade charm to your holiday décor. Perfect for centerpieces, brunch tables, or festive gifts, they bring a fresh and cheerful touch to Easter celebrations. Happy crafting!
12. Dollar Tree Easter Crafts: DIY Spring-Themed Table Runner
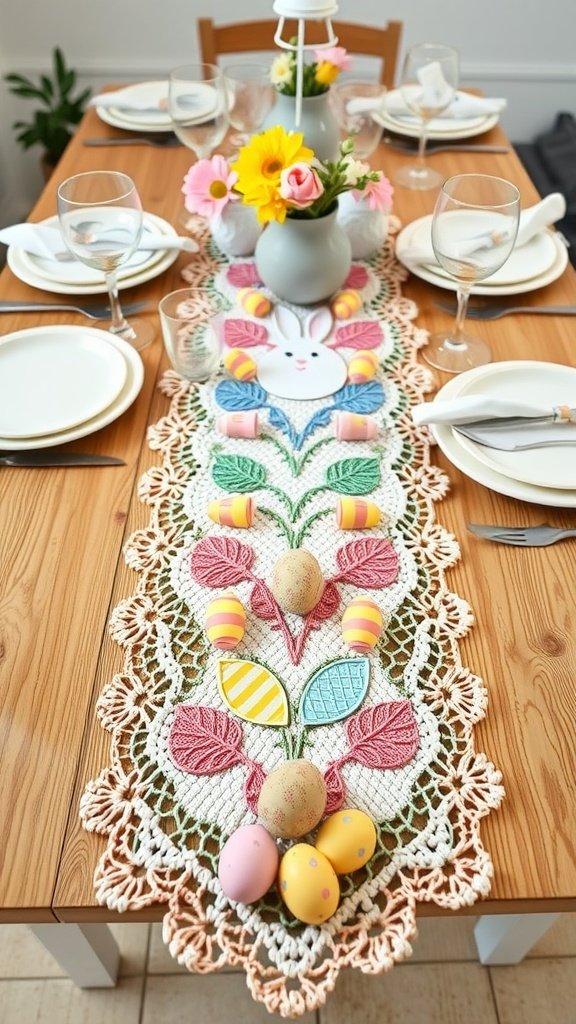
If you’re looking to brighten up your dining space for Easter, a spring-themed table runner is a delightful idea. This charming craft not only adds color but also creates a festive atmosphere for family gatherings. Using simple items from Dollar Tree, you can create a beautiful decoration that showcases the spirit of the season.
Add a festive and elegant touch to your Easter or springtime gatherings with this DIY Spring-Themed Table Runner! Using budget-friendly Dollar Tree supplies, you can create a unique and beautiful centerpiece for your dining table.
What You Need
✅ Burlap, felt, or fabric (Dollar Tree carries table runners and placemats that can be repurposed)
✅ Artificial flowers (pastel or bright spring colors)
✅ Ribbon or lace (optional for edges)
✅ Hot glue gun and glue sticks
✅ Scissors
✅ Stencils or fabric paint (for added designs)
✅ Small decorative elements (mini carrots, bunnies, butterflies, or faux greenery)
Instructions to Make It
- Choose Your Base Material – Cut a piece of burlap, felt, or fabric to the desired length for your table. Dollar Tree’s fabric rolls work great for this!
- Decorate the Edges – Glue ribbon, lace, or trim to the edges for a finished look.
- Add Floral Accents – Arrange artificial flowers along the runner’s sides or in clusters. Use hot glue to attach them securely.
- Incorporate Spring Elements – Glue on small decorative pieces like tiny bunnies, butterflies, or faux carrots to match the Easter theme.
- Personalize with Stencils or Paint – Use fabric paint or stencils to add words like “Happy Easter” or floral designs for a more detailed look.
- Let It Dry & Display – Once all embellishments are secure, place your Spring-Themed Table Runner in the center of your dining table and arrange a beautiful Easter tablescape around it.
Pro Tips
✔️ Use a White or Pastel Fabric for a Fresh Spring Look – Light colors brighten up your table setting.
✔️ Make It Reversible – Decorate both sides with different themes (one side for Easter, one for general spring use).
✔️ Add Fairy Lights for a Magical Touch – Weave small battery-operated string lights along the runner for a glowing effect.
✔️ Pair with Matching Placemats – Use extra fabric or felt to create matching placemats or coasters.
This DIY Spring-Themed Table Runner is a gorgeous and easy way to elevate your Easter décor while staying on budget. Whether for a festive brunch or an elegant dinner, this handmade piece will be a stunning addition to your spring celebrations. Happy crafting!
13. Dollar Tree Easter Crafts: DIY Spring-Themed Scrapbook Page
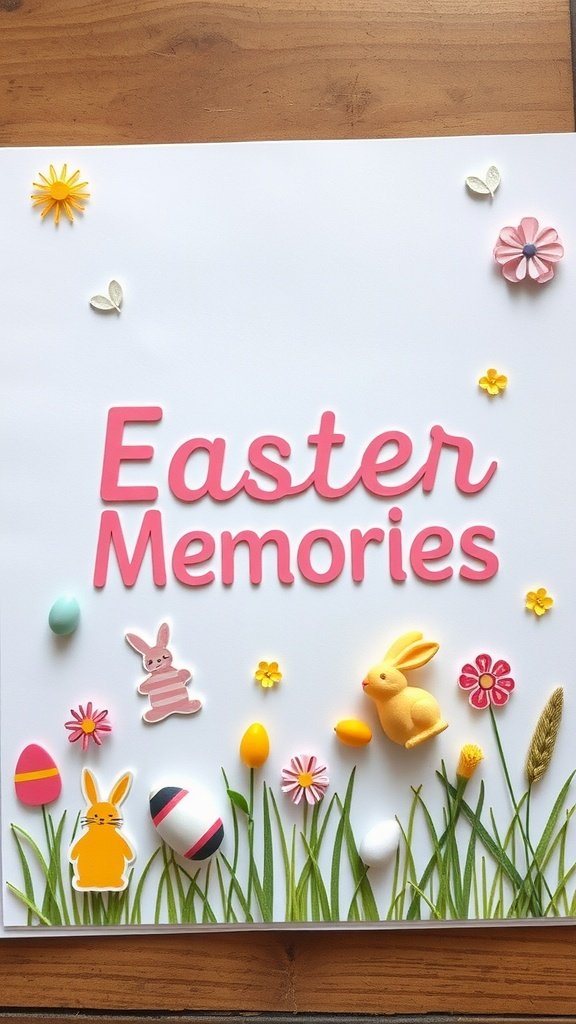
Creating a spring-themed scrapbook page is a delightful way to capture the joy of Easter. Using supplies from Dollar Tree, you can craft a beautiful layout that showcases your memories. The image features cheerful elements like colorful eggs, flowers, and a cute Easter bunny. It sets the perfect tone for your scrapbook page.
Capture the beauty of the season with a DIY Spring-Themed Scrapbook Page! This fun and creative project is perfect for preserving Easter memories, spring adventures, or seasonal family moments—all using budget-friendly Dollar Tree supplies.
What You Need
✅ Scrapbook paper or cardstock (pastel colors, floral prints, or textured paper)
✅ Stickers (spring, Easter, or floral themes)
✅ Decorative washi tape
✅ Paper flowers or artificial floral embellishments
✅ Ribbon or lace trim (optional)
✅ Glue stick or double-sided tape
✅ Scissors or craft punches (for fun shapes)
✅ Letter stickers or stencils (for titles)
✅ Photos or printed images (optional)
Instructions to Make It
- Choose Your Background Paper – Pick a scrapbook paper that fits your theme—pastel, floral, or Easter patterns work great.
- Layer Your Design – Add a second piece of patterned or solid cardstock as a frame for your photos. Use washi tape or ribbon to create borders.
- Arrange Photos & Embellishments – Lay out your photos and decorative elements (stickers, flowers, cutouts) before gluing to find the perfect arrangement.
- Create a Title – Use letter stickers, stencils, or hand-lettering to add a title like “Springtime Fun,” “Easter Memories,” or “Hello Spring.”
- Add Extra Details – Place small embellishments like butterflies, tiny bunnies, or floral stickers around the page for a whimsical touch.
- Secure Everything in Place – Once you’re happy with the layout, glue or tape down all elements securely.
- Personalize with Notes – Write a small caption or memory next to each photo to make it extra meaningful.
Pro Tips
✔️ Use Layering for Depth – Stack paper cutouts or flowers with foam tape for a 3D effect.
✔️ Mix & Match Textures – Felt stickers, lace, or fabric scraps add beautiful texture to your page.
✔️ Create a Pocket Page – Add a small envelope or folded paper pocket to hold extra photos or notes.
✔️ Try a Shaker Element – Use clear plastic and sequins to create a fun interactive shaker box on your page.
This DIY Spring-Themed Scrapbook Page is a beautiful way to cherish and showcase your favorite seasonal memories. Whether you’re celebrating Easter, a picnic in the park, or a garden stroll, this craft will bring your scrapbook to life. Happy crafting!
14. Dollar Tree Easter Crafts: DIY Egg Decorating Station
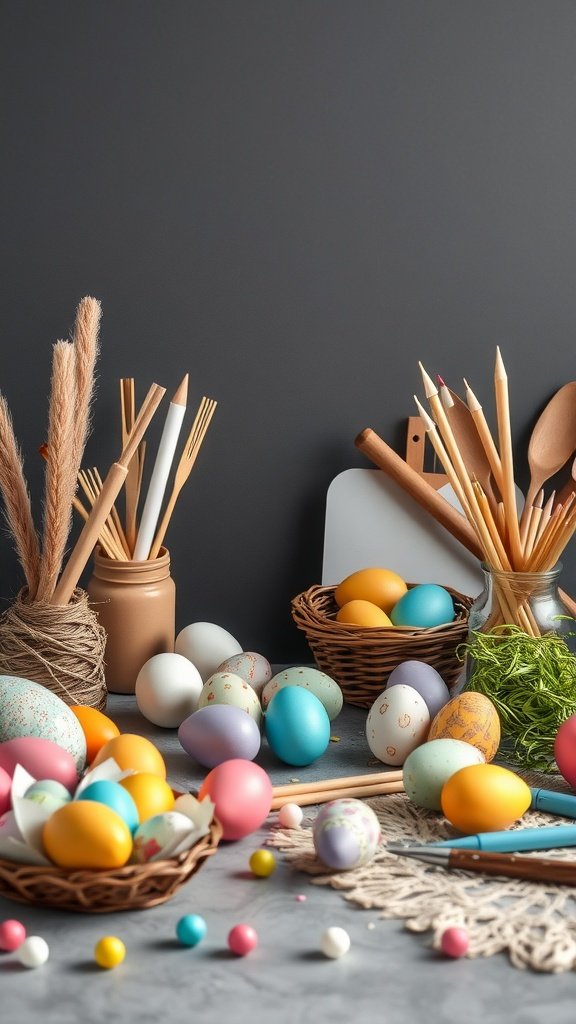
An egg decorating station is a fantastic way to dive into Dollar Tree Easter crafts 2025. With vibrant colors and fun designs, it’s a delightful activity for both kids and adults. This setup invites creativity and provides a space for everyone to express their artistic flair.
Make Easter extra fun and creative by setting up a DIY Egg Decorating Station! Perfect for family gatherings, classroom activities, or Easter parties, this setup allows everyone to personalize their eggs using budget-friendly supplies from Dollar Tree.
What You Need
✅ Hard-boiled eggs or plastic craft eggs
✅ Egg dye kits or food coloring
✅ Cups or bowls (for dyeing eggs)
✅ Paint and paintbrushes
✅ Stickers, washi tape, or stencils
✅ Glitter glue or metallic markers
✅ Small pom-poms, googly eyes, and pipe cleaners (for fun decorations)
✅ Hot glue gun or craft glue
✅ Paper towels and wipes (for easy cleanup)
✅ Drying rack (cooling rack or egg carton)
Instructions to Set It Up
- Prepare a Work Area – Cover the table with newspaper, a plastic tablecloth, or a Dollar Tree disposable table cover to make cleanup easy.
- Set Up Dyeing Stations – Fill cups with water, vinegar, and food coloring (or use an egg dye kit). Arrange them in one section of the table.
- Organize Painting & Decorating Supplies – Set out small cups or trays with paint, brushes, stickers, glitter glue, and markers for creative decorating.
- Provide Fun Embellishments – Place pom-poms, googly eyes, pipe cleaners, and stencils in small containers for easy access.
- Create a Drying Area – Use a cooling rack or upside-down egg cartons to let the eggs dry after dyeing or painting.
- Encourage Creativity! – Let everyone experiment with different decorating styles—traditional dyeing, painting, stickers, or even 3D embellishments.
Pro Tips
✔️ Use White Crayons for a Wax-Resist Effect – Draw designs before dyeing to create cool patterns!
✔️ Try Shaving Cream Marbling – Swirl food coloring in shaving cream, roll eggs in it, and wipe off for a beautiful marbled look.
✔️ Add Gold or Metallic Accents – Use metallic markers or gold foil sheets for an elegant touch.
✔️ Label Egg Holders for Each Person – Give each participant a section in the drying rack so they can easily find their eggs later.
This DIY Egg Decorating Station is a fun and festive way to celebrate Easter with family and friends. Whether you go traditional or get creative with designs, it’s sure to be a highlight of your Easter festivities. Happy decorating!
15. Dollar Tree Easter Crafts: DIY Miniature Easter Village
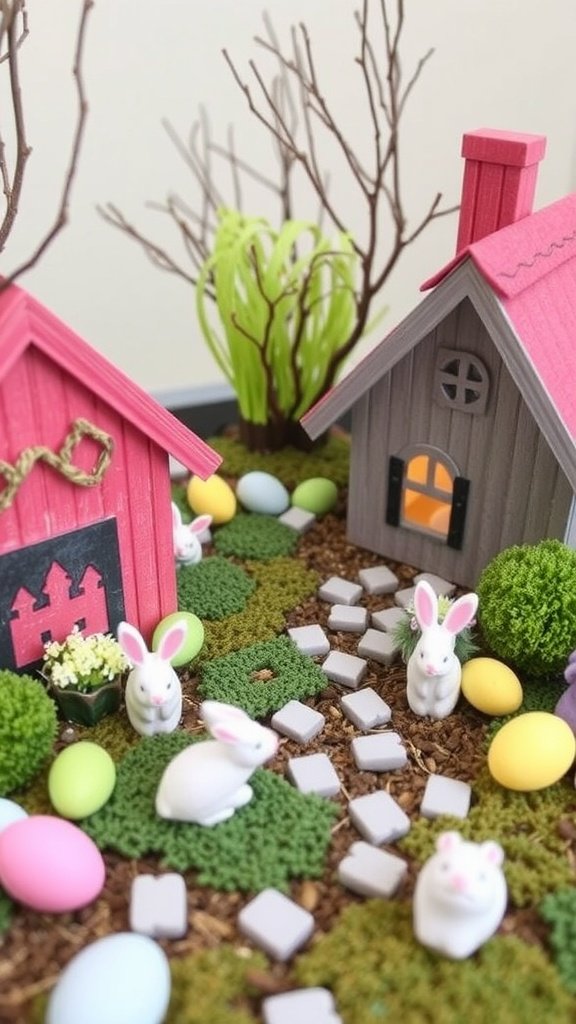
A Miniature Easter Village brings a delightful touch to your home during the spring season. Using simple items from Dollar Tree, you can create a charming little scene filled with Easter bunnies and colorful decorations. It’s an engaging way to add some cheer to your dollar tree easter decor.
Create a charming Miniature Easter Village using budget-friendly supplies from Dollar Tree! This adorable craft brings a whimsical, pastel-colored scene to life, perfect for a mantel, Easter table centerpiece, or kids’ play area.
What You Need
✅ Small wooden birdhouses (or mini cardboard houses)
✅ Acrylic paint (pastel colors like pink, yellow, lavender, and mint green)
✅ Paintbrushes
✅ Faux grass or green felt (for the village base)
✅ Mini Easter figurines (Dollar Tree bunnies, chicks, eggs, or lambs)
✅ Bottle brush trees or artificial flowers
✅ Cotton balls (to create clouds or bushes)
✅ Mini fences or popsicle sticks to create one
✅ Hot glue gun and glue sticks
✅ Glitter or Mod Podge (optional for sparkle)
✅ Small LED fairy lights (optional for a glowing effect)
Instructions to Make It
- Paint the Mini Houses – If using wooden birdhouses or cardboard houses, paint them in soft pastel shades. Let them dry completely.
- Create the Village Base – Lay down faux grass, green felt, or even a painted cardboard sheet to serve as the village ground.
- Arrange the Houses & Accessories – Place the mini houses on the base, spacing them out to create a small village layout.
- Add Easter Decorations – Glue small bunny or chick figurines near the houses to bring the village to life. Add mini eggs around the scene.
- Build a Fence or Pathways – Use mini fences or glue together popsicle sticks to create fences or walkways between houses.
- Attach Flowers & Trees – Place small artificial flowers or bottle brush trees to add a springtime feel.
- Add Final Touches – Sprinkle a little glitter or Mod Podge for sparkle, glue cotton balls for bushes or clouds, and place LED fairy lights for a magical glow.
- Display & Enjoy! – Place your Miniature Easter Village on a mantel, side table, or as a festive centerpiece!
Pro Tips
✔️ Use a Cake Stand for a Tiered Display – Staggering different heights adds depth to your village.
✔️ Turn It Into a Fairy Village – Add tiny doors, windows, and ladders to create an enchanting fairy Easter village.
✔️ Make It Interactive for Kids – Let kids move around the figurines and create their own Easter stories.
✔️ Incorporate a Water Feature – Use blue felt or a small mirror to represent a tiny pond.
This DIY Miniature Easter Village is a delightful, creative project that adds a touch of Easter magic to your home. Whether used as decor or a fun playset, this whimsical village is sure to bring joy this Easter season. Happy crafting!
16. Dollar Tree Easter Crafts: DIY Decorative Bunny Jars
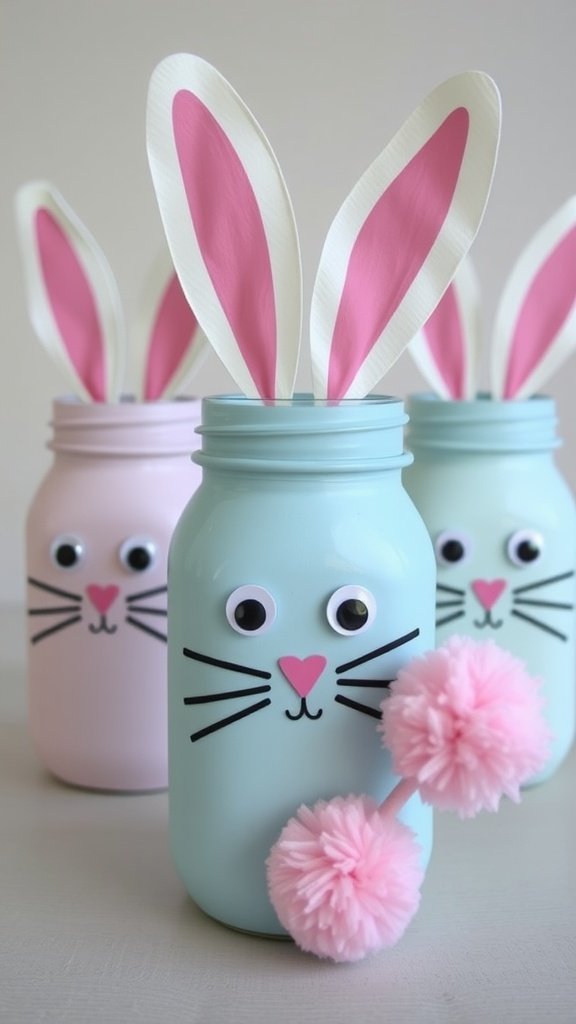
If you’re looking for a fun and easy project for your Easter decor, these decorative bunny jars are a great choice! They bring a cheerful touch to any space and are perfect for showcasing colorful candies or other treats. Plus, they make for a cute centerpiece during your Easter celebrations.
Transform simple jars into Decorative Bunny Jars for Easter! These adorable, budget-friendly jars can be used as treat holders, centerpieces, or festive home décor—all made with Dollar Tree supplies.
What You Need
✅ Glass or plastic jars (Mason jars, baby food jars, or recycled jars)
✅ Acrylic paint (white, pastel pink, lavender, or baby blue)
✅ Paintbrushes or sponge applicators
✅ Bunny ears (felt, foam, or pipe cleaners)
✅ Googly eyes or black paint pen (for the face)
✅ Small pom-poms or cotton balls (for the nose and tail)
✅ Ribbon or twine (optional for decoration)
✅ Hot glue gun and glue sticks
✅ Candy, Easter grass, or fairy lights (optional for filling)
Instructions to Make It
- Paint the Jar – Apply a coat of acrylic paint to the outside of the jar. Let it dry and add a second coat if needed.
- Create the Bunny Face – Glue on googly eyes or use a paint pen to draw cute eyes. Attach a small pom-pom for the nose and draw whiskers with a fine-tip marker.
- Add Bunny Ears – Cut out bunny ear shapes from felt or foam and glue them to the jar lid. You can also twist pipe cleaners into ear shapes for a fun 3D effect.
- Attach the Bunny Tail – Glue a cotton ball or pom-pom to the back of the jar for a fluffy tail.
- Decorate with Ribbon or Twine – Tie a small bow around the neck of the jar for an extra festive touch.
- Fill & Display – Fill the jar with jelly beans, mini chocolate eggs, or fairy lights for a glowing effect. Place on a table, shelf, or gift it to friends and family!
Pro Tips
✔️ Use Chalk Paint for a Rustic Look – A matte, distressed effect adds a farmhouse-style charm.
✔️ Turn It Into a Glow Jar – Insert battery-operated fairy lights inside for a magical nightlight.
✔️ Personalize with Names – Write names on the jar with a paint pen for cute place settings or gifts.
✔️ Make Mini Versions for Party Favors – Smaller jars are perfect for Easter giveaways!
These DIY Decorative Bunny Jars are a fun and festive way to celebrate Easter. Whether you use them for treats, décor, or gifting, they’re guaranteed to bring smiles this spring. Happy crafting!
17. Dollar Tree Easter Crafts: DIY Easter-Themed T-Shirt Designs

Easter is a time for fun, family, and creativity. Making your own Easter-themed t-shirts can be a delightful activity, especially using Dollar Tree supplies. The image showcases colorful t-shirts featuring festive designs like bunnies and Easter eggs, perfect for celebrating the season.
Create your own Easter-Themed T-Shirts with fun, festive designs using affordable Dollar Tree supplies! These personalized shirts are perfect for Easter egg hunts, family gatherings, or just celebrating spring in style.
What You Need
✅ Plain t-shirts (white or pastel colors)
✅ Fabric paint or fabric markers (Easter colors like pink, lavender, yellow, and mint green)
✅ Stencils or printable bunny, egg, or chick designs
✅ Sponge brushes or paintbrushes
✅ Iron-on transfers or heat transfer vinyl (optional)
✅ Scissors and an iron (if using iron-on designs)
✅ Glitter fabric paint or puffy paint (for extra details)
Instructions to Make It
- Choose a Design – Sketch or print out an Easter-themed design (bunny, Easter egg, chick, “Hoppy Easter,” “Egg Hunt Crew,” etc.).
- Prep the Shirt – Lay the t-shirt flat and place a piece of cardboard inside to prevent paint from bleeding through.
- Stencil or Freehand the Design – Use stencils or draw your design lightly with a fabric marker before painting.
- Paint & Decorate – Fill in the design with fabric paint, using sponge brushes for smooth coverage. Add puffy paint or glitter details if desired.
- Let It Dry – Allow the paint to dry completely before wearing or washing.
- Optional: Use Iron-On Transfers – Print a design onto iron-on transfer paper and apply it to the shirt with a household iron, following the instructions on the packaging.
- Wear & Show Off! – Your DIY Easter-Themed T-Shirt is ready to wear for the big day!
Pro Tips
✔️ Use a Cricut or Cutting Machine for Precise Designs – If you have a cutting machine, create vinyl decals for a professional look.
✔️ Layer Colors for a Tie-Dye Effect – Blend pastel fabric paints for a fun spring-inspired tie-dye look.
✔️ Make Matching Family Shirts – Create “Mama Bunny,” “Papa Bunny,” and “Little Bunny” designs for a coordinated Easter look.
✔️ Customize with Names – Add names to each shirt for personalized Easter gifts or team egg hunt outfits.
These DIY Easter-Themed T-Shirt Designs are a fun and creative way to celebrate the holiday in style. Whether for kids, adults, or an Easter party, these shirts will make your holiday extra special. Happy crafting!
18. Dollar Tree Easter Crafts: DIY Craft Stick Bunny Puppets
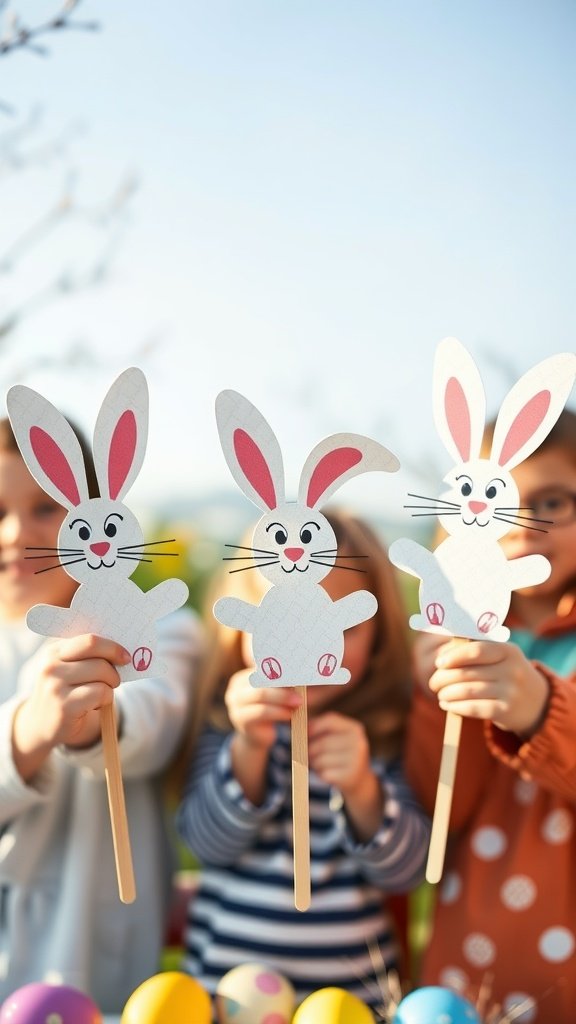
Craft Stick Bunny Puppets are a delightful addition to your Dollar Tree Easter crafts for kids. These charming little bunnies are simple to make and perfect for playful storytelling or festive decorations. Using just a few materials from Dollar Tree, you can create these fun puppets that capture the spirit of Easter.
Gather the kids around to enjoy this easy DIY project. Not only will they have fun crafting, but they will also love playing with their new bunny puppets afterward. Let’s dive into what you need and how to make these cute Easter bunny crafts!
These Craft Stick Bunny Puppets are a fun and easy Easter craft that kids will love! Using simple Dollar Tree supplies, you can create adorable bunny characters perfect for storytelling, Easter basket fillers, or puppet shows.
What You Need
✅ Wooden craft sticks (popsicle sticks)
✅ Colored cardstock or foam sheets (white, pink, or pastel colors)
✅ Googly eyes (or black marker for drawing eyes)
✅ Cotton balls or small pom-poms (for the tail and nose)
✅ Pipe cleaners (for whiskers or bendable ears)
✅ Glue (hot glue or craft glue)
✅ Scissors
✅ Markers or paint (optional for extra details)
Instructions to Make It
- Prepare the Craft Sticks – If desired, paint the craft sticks in pastel colors and let them dry. Otherwise, leave them natural for a rustic look.
- Cut Out Bunny Ears – Use white cardstock or foam sheets to cut out bunny ears. Cut smaller pink pieces for the inner ears and glue them onto the white ears.
- Attach the Ears – Glue the ears to the back of the craft stick so they stick up at the top.
- Create the Bunny Face – Glue on googly eyes or draw eyes with a black marker. Attach a small pom-pom or cotton ball for the nose.
- Add Whiskers & Tail – Cut small pieces of pipe cleaner and glue them below the nose for whiskers. Glue a cotton ball or pom-pom to the back for a fluffy tail.
- Decorate (Optional) – Use markers, stickers, or small bows to add personality to each bunny.
- Play & Enjoy! – Use your Craft Stick Bunny Puppets for storytelling, Easter puppet shows, or as adorable decorations!
Pro Tips
✔️ Make Different Bunny Expressions – Create sleepy, happy, or silly bunny faces for variety.
✔️ Turn Them Into Bookmarks – Instead of puppets, use them as cute Easter bookmarks!
✔️ Use Felt for a Soft Look – Cut ears and facial features from felt for a more textured craft.
✔️ Make a Whole Bunny Family – Create bunnies in different sizes for a fun puppet playtime!
These DIY Craft Stick Bunny Puppets are a fantastic way to keep kids entertained while celebrating Easter. Whether for creative play, storytelling, or festive decorations, they’re sure to bring lots of Easter fun. Happy crafting!
19. Dollar Tree Easter Crafts: DIY Paper Plate Easter Masks

Making paper plate Easter masks is a fun and simple craft that will brighten up your holiday celebrations. These masks are not only easy to create but also a great way for kids to get into the Easter spirit. With a little creativity, your children can transform simple paper plates into colorful Easter bunny masks, perfect for playtime or decorations.
Get creative this Easter with DIY Paper Plate Easter Masks! These adorable and easy-to-make masks are perfect for kids’ parties, Easter egg hunts, or fun photo sessions—all using budget-friendly Dollar Tree supplies.
What You Need
✅ Paper plates (white or pastel-colored)
✅ Scissors
✅ Colored cardstock or construction paper (for ears, noses, and decorations)
✅ Paint, markers, or crayons
✅ Googly eyes (or black marker for drawing eyes)
✅ Cotton balls or pom-poms (for noses or fluffy accents)
✅ Pipe cleaners or yarn (for whiskers)
✅ Hole punch and string OR wooden craft sticks (for holding the mask)
✅ Glue (hot glue or craft glue)
Instructions to Make It
- Cut Out the Mask Shape – If making a full-face mask, cut out eye holes from a paper plate. For a half-mask style, cut the plate in half and trim the edges as needed.
- Paint or Color the Mask – Use markers, crayons, or paint to create a bunny, chick, or lamb design.
- Add Ears & Features – Cut bunny ears, chick beaks, or lamb fluff from cardstock and glue them onto the mask. Use cotton balls for a fluffy lamb effect.
- Decorate the Face – Glue on googly eyes or draw them in, attach a pom-pom or paper nose, and add whiskers with pipe cleaners or yarn.
- Attach a Handle or String – Punch holes on the sides and tie a string for wearing, or glue a craft stick to the bottom for a handheld puppet-style mask.
- Let It Dry & Enjoy! – Once dry, kids can wear their masks for Easter fun and pretend play!
Pro Tips
✔️ Make Different Characters – Try a bunny, chick, lamb, or even a decorated Easter egg design!
✔️ Use Feathers for a Chick Mask – Adding small yellow feathers makes a chick mask extra cute.
✔️ Add Glitter for Sparkle – A little glitter glue makes the masks extra festive and fun.
✔️ Create a DIY Photo Booth – Set up a backdrop and let kids take fun Easter pictures with their masks!
These DIY Paper Plate Easter Masks are an easy and entertaining craft that brings smiles to kids and adults alike. Whether for an Easter party, school event, or just for fun, they’re sure to make your celebration more festive. Happy crafting!
20. Dollar Tree Easter Crafts: DIY Eggshell Seed Starters
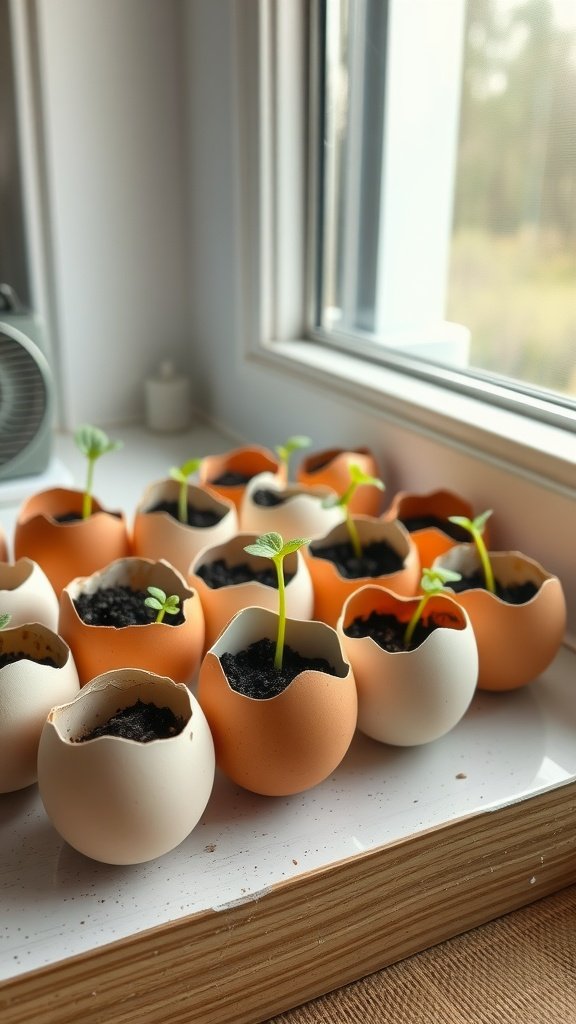
Eggshell seed starters are a cute and eco-friendly way to kick off your planting season. Using eggshells not only helps reduce waste but also adds a touch of charm to your home. This simple craft is perfect for kids and adults alike, making it one of the favorite dollar tree easter crafts for kids.
With just a few materials from your local Dollar Tree, you can create these delightful seed starters. They are not only practical but also a fun activity to prepare for spring. Plus, they can easily double as dollar tree easter decor!
Welcome spring with these eco-friendly Eggshell Seed Starters! This easy and fun Easter craft is perfect for kids and adults alike, helping you start a mini garden using recycled eggshells.
What You Need
✅ Empty eggshells (carefully cracked in half and rinsed)
✅ Egg carton (to hold the eggshell planters)
✅ Potting soil
✅ Seeds (herbs, flowers, or vegetables)
✅ Spoon or small scoop
✅ Spray bottle with water
✅ Markers or stickers (optional for decorating)
Instructions to Make It
- Prepare the Eggshells – Carefully rinse and dry the eggshell halves after cracking.
- Set Up the Egg Carton – Place the empty shells in an egg carton for stability.
- Fill with Soil – Use a spoon to add potting soil into each eggshell, leaving a little space at the top.
- Plant the Seeds – Place 1-2 seeds in each shell, following the seed packet’s planting depth instructions.
- Water Gently – Use a spray bottle to lightly mist the soil, keeping it moist but not soaked.
- Label & Decorate (Optional) – Use markers or stickers to label each seed type or draw cute Easter designs on the eggshells.
- Place in a Sunny Spot – Keep your Eggshell Seed Starters near a window where they’ll get plenty of light.
- Transplant When Ready – Once the seedlings grow big enough, gently crack the bottom of the eggshell and plant it directly in a garden or larger pot—the eggshell adds nutrients to the soil!
Pro Tips
✔️ Use Herbs for an Easter Kitchen Garden – Basil, parsley, and chives grow well in small spaces!
✔️ Add a Drainage Hole – Lightly poke a tiny hole at the bottom of the shell for better water drainage.
✔️ Paint the Shells for a Decorative Touch – Add pastel colors or designs to make them extra festive.
✔️ Make It a Gift – Tie a ribbon around the egg carton and give it as a springtime gift!
These DIY Eggshell Seed Starters are a fun, sustainable way to celebrate Easter and spring gardening. Perfect for little gardeners and plant lovers alike!
21. Dollar Tree Easter Crafts: DIY Easter Egg Tree
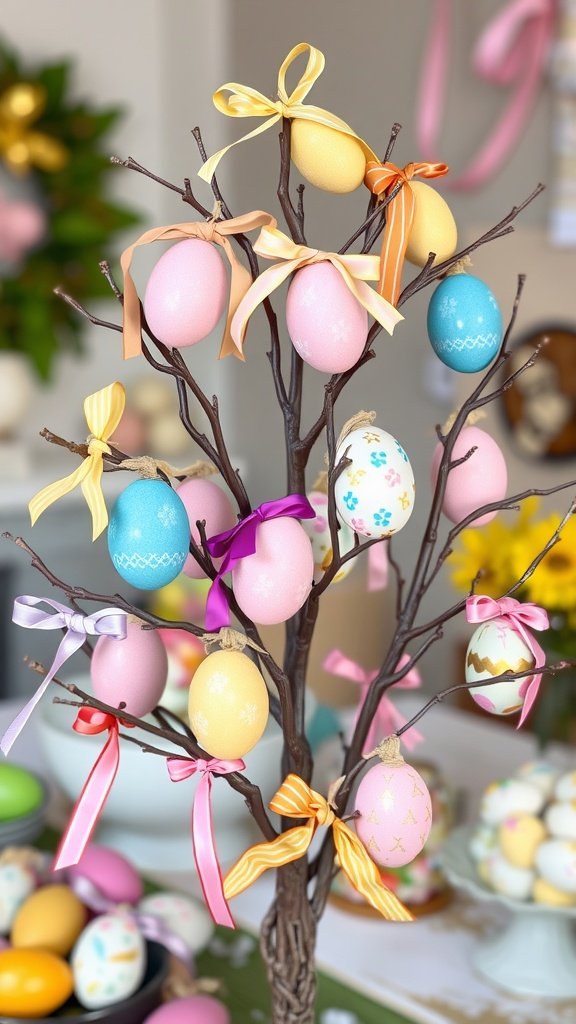
The DIY Easter Egg Tree is a charming way to bring some festive cheer to your home. With its bright colors and playful decorations, it’s sure to catch the eye of anyone who passes by. Use this as a centerpiece or as part of your dollar tree easter decor to create a joyful atmosphere.
Create a beautiful DIY Easter Egg Tree to bring a festive and elegant touch to your Easter décor! This fun and budget-friendly craft uses simple Dollar Tree supplies to make a stunning centerpiece for your home.
What You Need
✅ Small tree branches (from your yard or Dollar Tree floral section)
✅ Vase, mason jar, or flower pot
✅ Plastic or foam Easter eggs (pastel or glittered)
✅ Ribbon or twine
✅ Hot glue gun and glue sticks
✅ Decorative moss, Easter grass, or pebbles (for the base)
✅ Paint and paintbrushes (optional for coloring branches)
✅ Mini artificial flowers or greenery (optional)
Instructions to Make It
- Prepare the Branches – Find sturdy branches and trim them to fit your vase. For a polished look, spray paint them white, gold, or pastel. Let them dry completely.
- Secure the Base – Place the branches in a vase or flower pot, filling it with decorative moss, Easter grass, or pebbles to keep them stable.
- Decorate the Eggs – If desired, paint plastic eggs, add glitter, or wrap them in twine for a farmhouse look.
- Attach Ribbons to the Eggs – Cut small pieces of ribbon or twine, glue them to the tops of the eggs, and create loops for hanging.
- Hang the Eggs on the Tree – Space them evenly among the branches, mixing colors and sizes for a balanced look.
- Add Extra Decorations – Attach small artificial flowers, mini butterflies, or tiny bows for extra charm.
- Display & Enjoy! – Place your DIY Easter Egg Tree on your table, mantel, or entryway for a stunning Easter display!
Pro Tips
✔️ Use a Pre-Lit Tree for Extra Glow – A mini LED tree makes a beautiful lighted centerpiece.
✔️ Make a Monochrome Tree – Stick to a single color theme (all white, pink & gold, or pastel hues) for a chic, elegant look.
✔️ Turn It Into a Family Tradition – Let kids decorate their own eggs each year to add to the tree.
✔️ Use a Larger Branch for a Statement Piece – A big tree branch in a floor-standing vase makes an eye-catching Easter decoration.
This DIY Easter Egg Tree is a gorgeous and creative way to celebrate the season. Whether used as a centerpiece or a fun family project, it’s sure to bring joy to your Easter festivities. Happy crafting!
With these 21 creative Dollar Tree Easter crafts, you can bring festive charm to your home without spending a fortune! Whether you’re making adorable Easter Egg Hunt Bags, whimsical Mason Jar Lanterns, or fun Craft Stick Bunny Puppets, these projects are perfect for adding a personal touch to your celebrations.
So, grab your supplies and get crafting! Have fun!