If you’re looking to dive into the world of crochet but don’t want to tackle complicated patterns just yet, you’re in the right spot! These easy crochet projects are perfect for beginners or anyone wanting a relaxing crafting session. Each project comes with a simple list of materials and clear instructions, so you can start creating beautiful pieces without the hassle. Let’s grab those hooks and yarn and get crafting!
1. Basic Crochet Scarf
A crochet scarf is an ideal project for beginners looking to get started with easy crochet. This beautiful pink scarf in the picture showcases a lovely texture that not only looks cozy but is also simple enough to create.
To begin making this scarf, you’ll need a few supplies, including a soft yarn and a crochet hook. The pattern involves basic stitches, making it a great choice for practicing your skills while creating something useful.
What You Need:
- Medium-weight yarn (worsted weight, acrylic or wool blend is great for beginners)
- Size I/9 (5.5mm) crochet hook
- Scissors
- Yarn needle
Instructions:
- Create a Foundation Chain:
- Make a slip knot and chain 30-40 stitches (or adjust for desired width).
- Start Crocheting:
- Work a row of single crochet (SC) or double crochet (DC) across. You can even use triple crochet (TC) to make it even easier and quicker. (You can also experiment with SC, DC and TC alternating SC and DC or DC and TC rows in different combinations to make interesting patterns. e.g one row of each or 2 DC rows then 1 TC row)
- Turn your work, chain 1 (for SC) or chain 2 (for DC), or chain 3 (for TC) then repeat the row.
- Continue the Rows:
- Keep crocheting rows until the scarf reaches approximately 60 inches or your preferred length.
- Finish Off:
- Cut the yarn, leaving a 6-inch tail.
- Pull the tail through the last loop and tighten.
- Weave in loose ends using a yarn needle.
- Optional: Add fringes by cutting yarn strands, folding them in half, and looping them through the scarf edges.
For free scarf patterns see https://easycrochet.com/category/crochet-patterns/scarves/
2. Fun Crochet Keychains
Crochet keychains are a delightful way to add a personal touch to your everyday items. The bright colors and playful designs shown in the image above highlight the fun possibilities of this easy crochet project. Each keychain is unique, making them perfect as gifts or for keeping your own keys organized.
One of the best parts about crochet keychains is how quick they are to make. If you’re looking for a simple project that doesn’t take much time, this is it! Let’s dive into what you’ll need and how to create your own.
What You Need:
- Small amounts of cotton yarn (any colors)
- Size E/4 (3.5mm) crochet hook
- Keychain ring
- Scissors
- Yarn needle
- Stuffing (for plush keychains)
- Stitch marker (optional)
Instructions:
- Make a Magic Ring:
- Create a magic ring and work 6 single crochet (SC) stitches inside it.
- Pull tight to close the ring.
- Increase Rounds:
- Round 1: 2 SC into each stitch (12 stitches total).
- Round 2: SC in first stitch, 2 SC in next stitch, repeat around (18 stitches total).
- Round 3: SC in first 2 stitches, 2 SC in next stitch, repeat around (24 stitches total).
- Continue increasing in this pattern until the shape is the desired width.
- Shape the Keychain:
- Work even rounds (1 SC in each stitch) to maintain the shape.
- If making a plush shape, work decrease stitches (the opposite of the increase rounds above. i.e. where it says to increase by doing 2 SC into one stitch, do the opposite and crochet 2 together) to close.
- Stuff and Close:
- If making a plush keychain, add stuffing before closing.
- Work SC decrease (SC two stitches together) around until only 6 stitches remain, then close.
- Attach to Keyring:
- Slip the keychain ring through the top loop and secure it tightly.
For more keychain patterns see:https://makeanddocrew.com/crochet-keychain-patterns/
3. Stylish Crochet Headbands
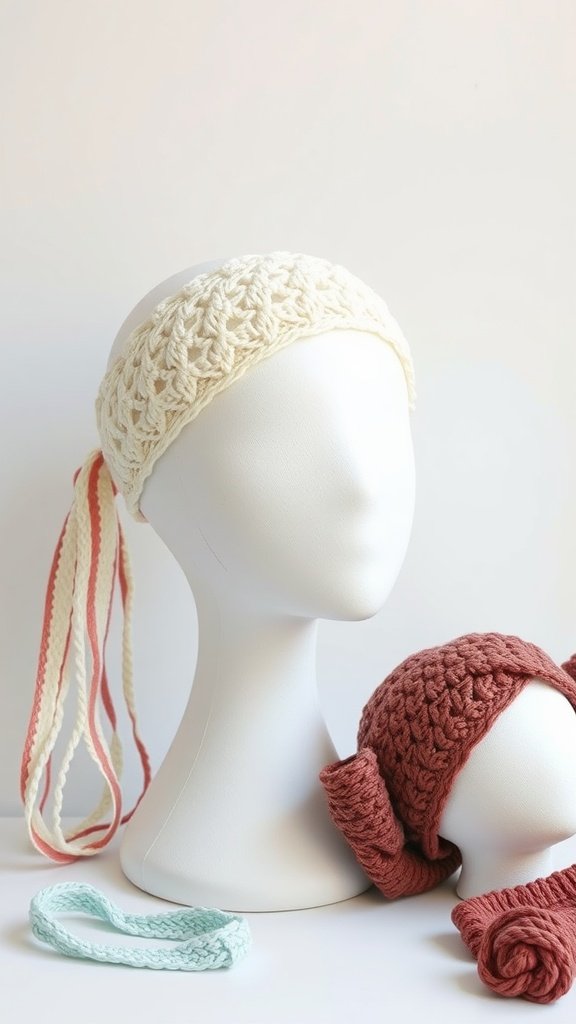
Crochet headbands are a fun way to express your style while keeping your hair in check. In the image, you can see a variety of headbands, each showcasing different textures and colors. The creamy headband has a lovely braided look, while the maroon one features a cute bow. The light blue one adds a pop of color and a bit of flair. These pieces are not just fashionable; they are also easy crochet projects you can tackle in a short time.
Making crochet headbands is a perfect weekend activity. You can use various stitches to create different patterns, making each headband unique. Plus, they make great gifts!
What You Need: (For a basic headband)
- Soft worsted weight yarn
- Size H/8 (5mm) crochet hook
- Scissors
- Yarn needle
Instructions:
- Create a Foundation Chain:
- Chain 55-70 stitches (adjust for head size).
- Start Crocheting:
- Work half double crochet (HDC) or single crochet (SC) in each stitch across. (You can use double crochet (DC) or even triple crochet (TC) to make it quicker and easier).
- Chain 1, turn, and repeat rows until it reaches about 3-4 inches in width.
- Finish Off:
- Bind off and weave in the ends.
- Sew the ends together to form a loop, or twist once before sewing for a turban-style headband.
- Optional: Add a bow, buttons, or embellishments for extra style.
4. Adorable Amigurumi Animals
If you’re looking for easy crochet projects, amigurumi animals are a delightful choice. These charming little creatures can bring a smile not only to the maker but also to anyone who receives them. With their bright colors and cute designs, they’re perfect for gifts or home decor.
Creating your own amigurumi is not only fun, but it can also be quite relaxing. Plus, these quick crochet projects are usually made in just a few hours, making them ideal for crafters of all skill levels.
Let’s dive into a simple pattern for an adorable crocheted bear!
What You Need:
- Cotton or acrylic yarn in desired colors
- Size G/6 (4mm) crochet hook
- Scissors
- Yarn needle
- Stuffing
- Stitch marker
- Safety eyes (optional)
Instructions (Basic Amigurumi Ball Shape – Used for Many Animals)
- Make a Magic Ring:
- Work 6 SC into the magic ring and tighten.
- Increase Rounds:
- Round 1: 2 SC in each stitch (12 stitches total).
- Round 2: SC in first stitch, 2 SC in next stitch, repeat around (18 stitches total).
- Round 3: SC in first 2 stitches, 2 SC in next stitch, repeat around (24 stitches total).
- Continue increasing in this pattern until the shape is the desired width.
- Shape the Body:
- Work even rounds (1 SC in each stitch) until the body is tall enough.
- Decrease and Stuff:
- Begin decreasing rounds (SC two stitches together) while adding stuffing.
- Round 1: SC in first 2 stitches, SC decrease, repeat around.
- Round 2: SC in first stitch, SC decrease, repeat around.
- Round 3: SC decrease in each stitch until closed.
- Once closed, weave in the ends securely.
- Add Features:
- Attach safety eyes, crochet ears, legs, and a tail depending on the animal
For free patterns in more detail go here: https://www.allfreecrochet.com/Crochet-Amigurumi-Patterns/Mini-Crochet-Animals-Free-Patterns
or here: https://easycrochet.com/category/crochet-patterns/amigurumi-crochet-patterns/page/2/
5. Cute Crochet Baskets
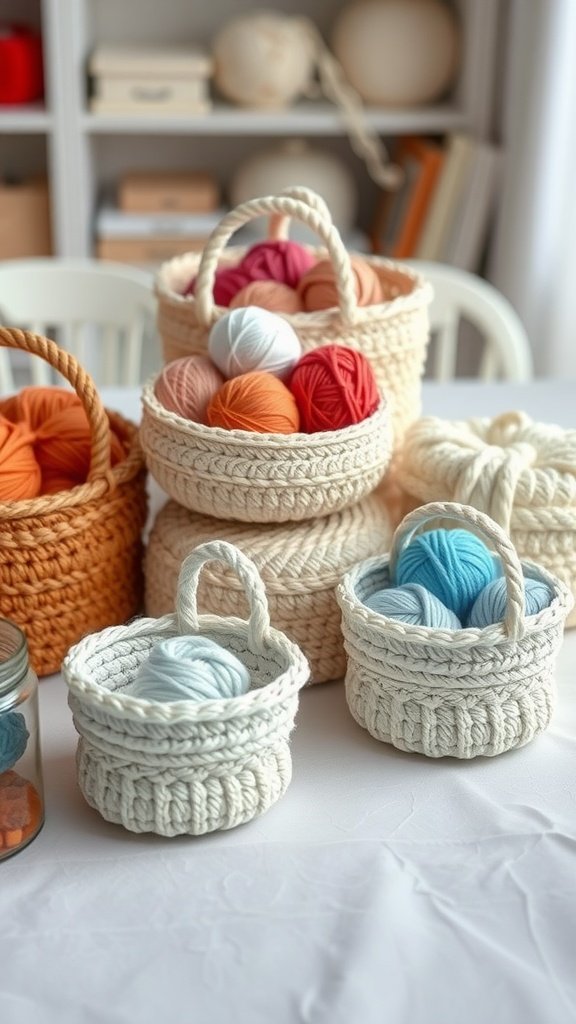
Cute crochet baskets are an easy crochet project that can brighten up any space. They’re not just charming; they also serve a practical purpose. You can use them to store yarn, craft supplies, or even as decorative pieces around your home.
In the image, you see a variety of crochet baskets in different sizes and colors. Each basket is uniquely styled, showcasing the beautiful textures and stitches that crochet can offer. The soft yarns peeking out from the baskets add a delightful touch of color to the scene.
These baskets are perfect for quick crochet projects. You can whip up a set in an afternoon, making them ideal for beginners and experienced crocheters alike. Plus, they make thoughtful gifts!
What You Need:
- Super bulky yarn or multiple strands of worsted weight yarn
- Size L/8.0mm crochet hook
- Scissors
- Yarn needle
Instructions:
- Start with a Magic Ring:
- Work 6 single crochet (SC) stitches into the magic ring and tighten.
- Increase for the Base:
- Round 1: 2 SC in each stitch around (12 stitches total).
- Round 2: SC in first stitch, 2 SC in next stitch, repeat around (18 stitches total).
- Round 3: SC in first 2 stitches, 2 SC in next stitch, repeat around (24 stitches total).
- Continue increasing until the base is the desired size.
- Work the Sides:
- Stop increasing and crochet SC in each stitch in the round to build up the sides.
- Create a Rim:
- Work a slip stitch or crab stitch round for a decorative edge.
- Finish Off:
- Bind off and weave in the ends.
- Optionally, add a loop for hanging or handles for carrying.
6. Charming Crochet Coasters
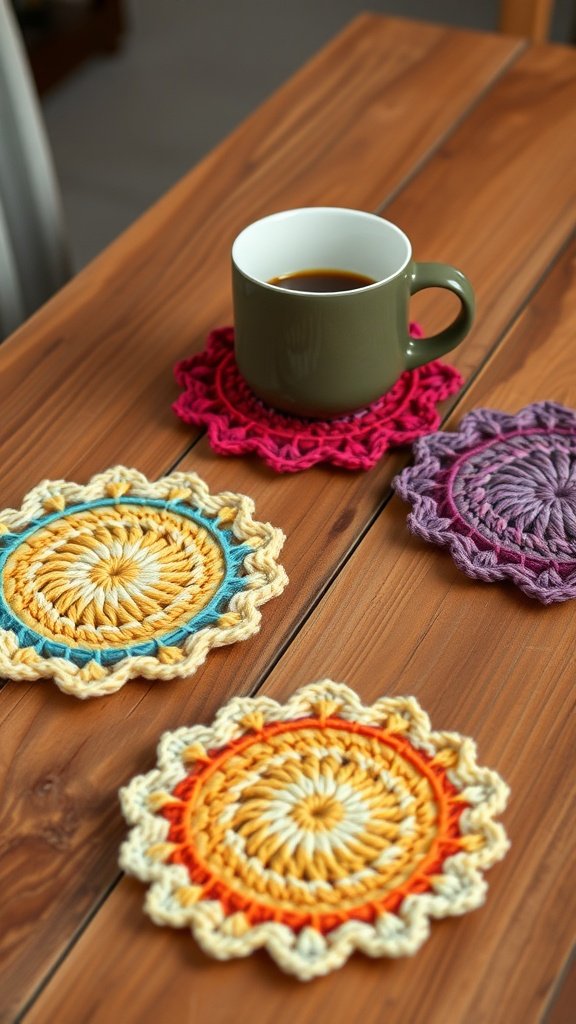
These charming crochet coasters are a delightful addition to any coffee table. They not only protect your surfaces but also add a splash of color to your home. Each coaster features a unique design, making them perfect for mixing and matching.
Creating these coasters is one of the quick crochet projects you can dive into. You can whip them up in no time, even if you’re a beginner. Let’s get started on making your own!
What You Need:
- Medium-weight cotton yarn (preferred for absorbency)
- Size H/8 (5.0mm) crochet hook
- Scissors
- Yarn needle
Instructions:
- Make a Magic Ring:
- Create a magic ring and work 12 double crochet (DC) stitches into the ring.
- Pull the ring tight and join with a slip stitch to the first DC.
- Round 1 (Increase Round):
- Chain 3 (counts as 1st DC), 1 DC in the same stitch. You can use treble crochet (TC) for this round to get the same look as those in the picture)
- Work 2 DC in each stitch around (24 total).
- Join with a slip stitch to the first DC.
- Round 2 (Continue Increasing):
- Chain 3, 1 DC in next stitch, 2 DC in the next stitch, repeat around (36 total).
- Join with a slip stitch.
- Round 3 (Final Round – Decorative Edge):
- Chain 1, SC in each stitch around, join with a slip stitch.
- Optional: Use a picot edge or reverse SC for added texture.
- (to add the shell patterns around the edge to finish the coaster, as in the picture, you can also do 3 TC into 1 stitch then miss 2 stitches and do a DC into the next stitch then miss 2 stitches and do 3 TC into the next stitch etc all the way around the edge.) Use a variety of different colors for rows to make the coasters interesting)
- Finishing:
- Fasten off and weave in ends.
7. Cozy Crochet Cup Sleeves
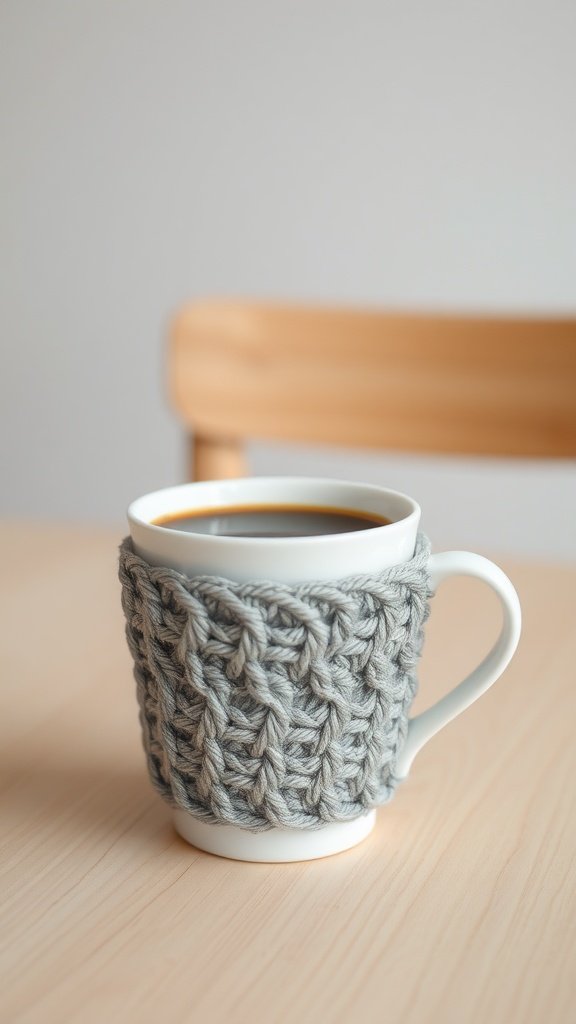
Cozy crochet cup sleeves are a simple yet charming way to add a personal touch to your morning coffee routine. These sleeves not only look cute but also keep your hands safe from hot beverages. Using quick crochet techniques, you can whip one up in no time.
To get started, you’ll need some basic materials. Choose a soft yarn in your favorite color and grab a crochet hook that fits the yarn size. The texture seen in the image adds a cozy vibe, making your cup feel even more special.
What is Needed:
- Soft yarn (medium weight)
- Crochet hook (size H/8 or suitable for your yarn)
- Scissors
- Tapestry needle for weaving in ends
Instructions:
1.Chain your foundation:Start by making a slip knot, then chain 30. Adjust the number of chains to fit your cup’s circumference.
2.Form the base:In the second chain from the hook, work a single crochet. Continue single crocheting across the chain. You’ll have a nice, sturdy base.
3.Build the body: To create the body, switch to half double crochet stitches. This gives a lovely texture and flexibility. Work in rows until the sleeve reaches your desired height. N.B. if your cup is not straight sides you will need to increase as you work your way up by doing 2 stitches into 1 at even intervals to fit the shape of your cup. This may need a little trial and error.
4.Finishing touches: Once you reach the top, slip stitch to join the ends. Cut the yarn, leaving a long tail. Use the tapestry needle to weave in any loose ends.
Now, just slide your cozy crochet cup sleeve onto your mug and enjoy your drink in style! This easy crochet project is a delightful way to brighten your day.
8. Simple Granny Square Blanket
The Simple Granny Square Blanket is a cozy and vibrant addition to any home. Its colorful squares come together to create a warm and inviting piece that’s not only beautiful but also functional.
This blanket features a charming mix of colors like deep reds, bright blues, and sunny yellows, making it a cheerful decoration for your living space. The granny squares are stitched together with care, showcasing the classic crochet design that many love.
Making this blanket is a wonderful project for anyone looking for quick crochet ideas. It’s an ideal choice for beginners who want to learn basic stitches while creating something lovely.
What You Need:
- Worsted weight yarn (multiple colors if desired)
- Size J/10 (6.0mm) crochet hook
- Scissors
- Yarn needle
Instructions:
- Foundation Round:
- Chain 4, slip stitch to form a ring.
- Chain 3 (counts as first DC), 2 DC into the ring, chain 2.
- 3 DC, chain 2 three more times.
- Join with a slip stitch to the top of the beginning chain.
- Round 1:
- Slip stitch to the corner space.
- Chain 3, 2 DC, chain 2, 3 DC (creates a corner).
- In each chain-2 space, work 3 DC, chain 2, 3 DC.
- Join with a slip stitch.
- Round 2 and Beyond:
- Continue the pattern:
- Work 3 DC in each side space and (3 DC, chain 2, 3 DC) in each corner space.
- Continue increasing the square size until the blanket is the desired size.
- Continue the pattern:
- Finishing:
- Fasten off, weave in ends, and add a border if desired.
Do different color combinations and patterns to lay the squares out for your blanket. Join the squares with DC in the same color as the edgings or a contrasting color to add interest. Happy crocheting!
9. Easy Crochet Dishcloths
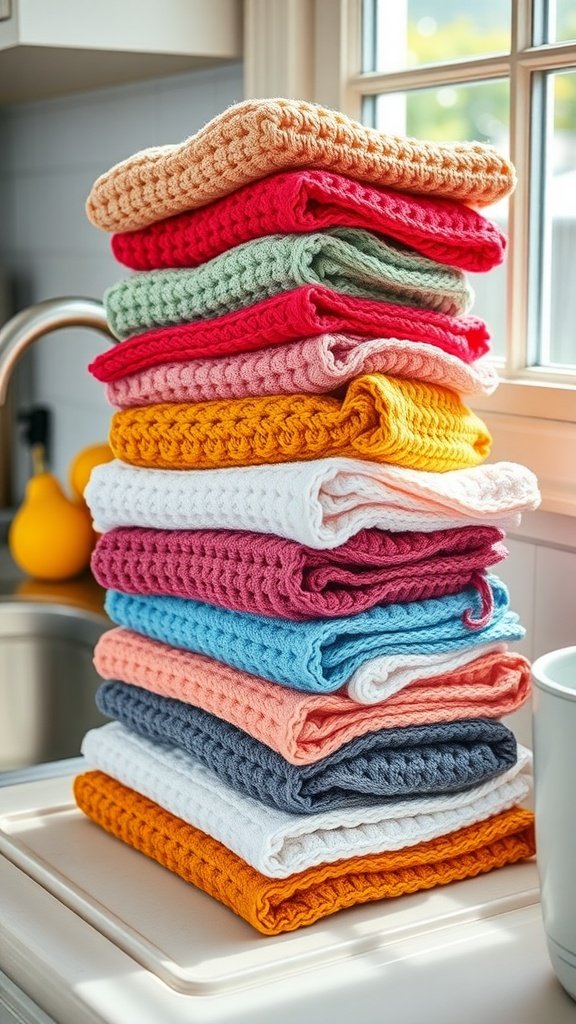
Looking at this colorful stack of crochet dishcloths, you can’t help but feel inspired to create your own. These easy crochet projects are not only practical but also add a splash of color to your kitchen. With various shades of yarn, you can mix and match to suit your style.
Making dishcloths is a great way to practice your crochet skills without feeling overwhelmed. Plus, they make excellent gifts for friends and family. Let’s dive into what you need to get started and how to whip up your very own dishcloths!
What You Need:
- 100% cotton yarn (worsted weight)
- Size H/8 (5.0mm) crochet hook
- Scissors
- Yarn needle
Instructions:
- Foundation Chain:
- Chain 30 (or desired width).
- Row 1 (Base Row):
- In the second chain from the hook, SC across. (29 stitches)
- Chain 1, turn.
- Rows 2-20 (Textured Stitch Pattern):
- Alternate between SC and HDC (half double crochet) stitches in each row. (or you can use DC for each row).
- Always chain 1 at the end of each row before turning.
- Final Row & Border (Optional):
- Work SC evenly around the entire dishcloth, placing 3 SC in each corner.
- Fasten off and weave in ends.
10. Quick Crochet Phone Cases
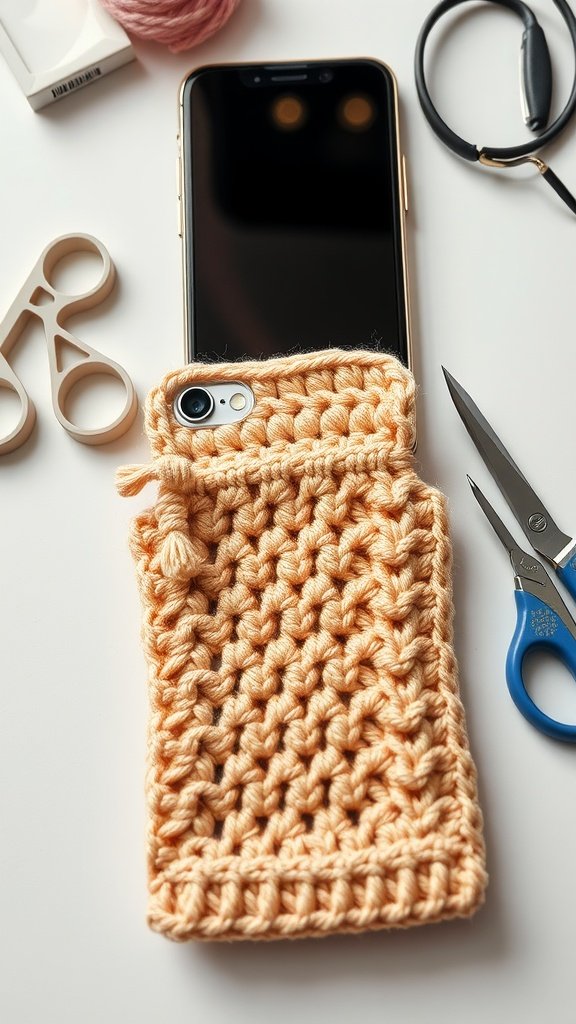
Crocheting phone cases is one of the easiest crochet projects you can dive into. They are functional, stylish, and make for quick crochet sessions. Plus, they’re a great way to use up leftover yarn.
The image shows a cozy, crocheted phone case in a warm peach color. It’s snugly fitted and perfect for protecting your phone while adding a personal touch. You can see a few crochet tools nearby, which hints at how simple and enjoyable this project is.
- Worsted weight yarn (acrylic or cotton)
- Size G/6 (4.0mm) crochet hook
- Scissors
- Yarn needle
- Button (optional for closure)
Instructions:
- Foundation Chain:
- Chain 12-15 stitches (depending on phone width).
- Row 1 (Base):
- SC in the second chain from the hook and in each stitch across.
- Chain 1, turn.
- Rows 2-25 (Build the Case):
- Continue working SC rows until the piece reaches twice the height of your phone.
- Fold & Seam:
- Fold the piece in half and SC along the sides to join, leaving one side open.
- Fasten off and weave in ends.
- Optional Button Closure:
- Sew a button on the front and create a loop with a chain stitch on the back to fasten over the button.
11. Delicate Crochet Bookmark
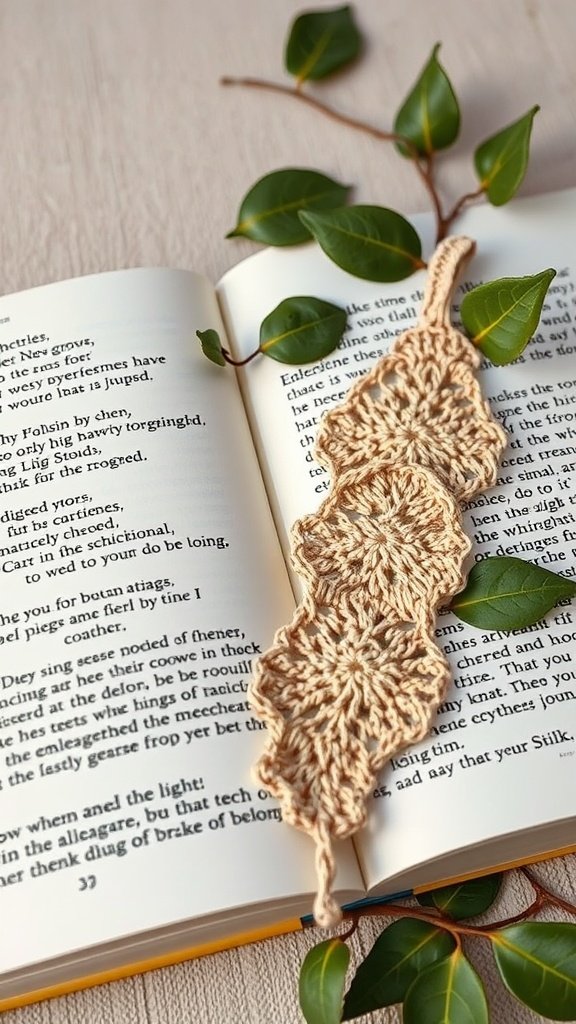
A delicate crochet bookmark is a lovely addition to any book lover’s collection. This project combines creativity with functionality, making it one of the easiest crochet projects out there. The bookmark not only serves its purpose but also adds a touch of charm to your reading experience.
The image shows a beautifully crafted crochet bookmark, shaped like a leaf. It’s placed gently on an open book, surrounded by green leaves, creating a serene reading atmosphere. This design is simple yet elegant, making it perfect for quick crochet sessions.
What You Need:
- Lightweight cotton yarn or crochet thread
- Size 2.5mm steel crochet hook
- Scissors
- Yarn needle
Instructions:
- Foundation Chain:
- Chain 30-40 stitches (adjust for bookmark length).
- Row 1 (Base Row):
- SC in the second chain from the hook and across.
- Chain 1, turn.
- Rows 2-10 (Lacy Design):
- Chain 3, skip 2 stitches, DC in the next stitch. Repeat across.
- Chain 1, turn.
- Rows 11-15 (Solid Border):
- Work SC in each stitch across to create a solid border.
- Finishing:
- Add a decorative tassel or small crochet flower at one end.
- Fasten off and weave in ends.
To make the bookmark in the picture:
1. Make 3 circles. Chain 6 and join to make a ring. Do 20 DC or TC into the ring to make the circle.
2. Join the 3 circles end on end together along 6 stitches from each circle by using a SC through each stitch to join the circles.
3. On each end do 5 SC into the end 5 stitches.
4. Break the yarn and rejoin to the middle of the 5 stitches and make a chain the desired length. You can SC or DC along the chain if you want a thicker tassel on the end. You can also double it over if you choose and join it back to the same stitch with a DC or SC.
12. Warm Crochet Mittens
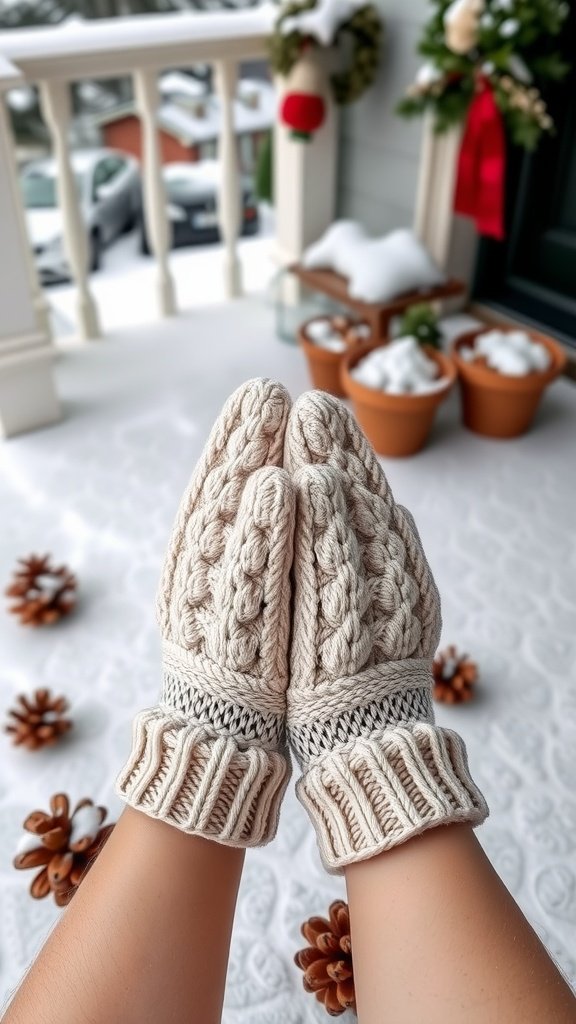
These warm crochet mittens are a delightful project for anyone looking to dive into easy crochet. They are not only practical for chilly days but also add a cozy touch to your winter wardrobe.
The mittens in the image showcase a lovely cream color with charming ribbed patterns that add texture and warmth. You can almost feel the softness just by looking at them! Surrounding the mittens are pinecones, hinting at the lovely outdoor settings where these mittens can be worn.
This project is ideal for beginners and those who enjoy quick crochet tasks. Let’s explore what you need and how to make these mittens.
What You Need:
- Worsted weight yarn (wool or acrylic for warmth)
- Size H/8 (5.0mm) crochet hook
- Scissors
- Yarn needle
- Stitch marker
Instructions:
- Cuff:
- Chain 10 (or desired cuff width).
- Row 1: SC in the second chain from the hook and in each chain across. (9 stitches)
- Row 2-20: SC in the back loop only (BLO) across to create ribbing.
- Joining the Cuff:
- Fold in half and slip stitch the edges together to form a loop.
- Mitten Body:
- Work 30 SC evenly around the cuff and join with a slip stitch.
- Rounds 1-10: SC in each stitch around.
- Thumb Opening:
- SC 15 stitches, chain 6, skip 6 stitches, continue SC around.
- Continue Mitten Shape:
- Rounds 11-20: SC in each stitch (including the chain stitches).
- Closing the Top:
- Begin SC decreases until only 6 stitches remain.
- Fasten off and weave in ends.
- Thumb:
- Attach yarn to the skipped stitches and SC around for 6 rounds.
- Fasten off and weave in ends.
13. Chic Crochet Plant Hangers
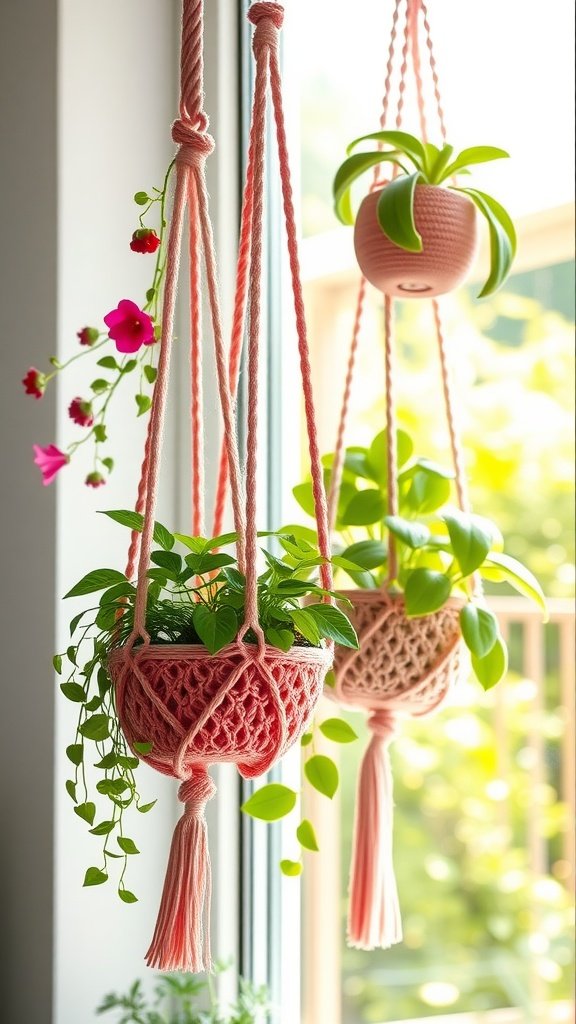
Adding a touch of greenery to your home is easy, especially with these chic crochet plant hangers. They not only showcase your favorite plants but also add a cozy vibe to any space. With just a few simple crochet techniques, you can create beautiful hangers that complement your decor.
These plant hangers are perfect for anyone looking for easy crochet projects. They feature a blend of style and functionality, making them a great addition to your living room or kitchen. Plus, they can be made quickly, allowing you to enjoy your handiwork in no time.
What You Need:
- Cotton yarn (strong and durable)
- Size G/6 (4.0mm) crochet hook
- Scissors
- Wooden ring (optional for hanging)
Instructions:
- Foundation:
- Chain 6, join into a ring with a slip stitch.
- Base of Hanger:
- Round 1: Work 12 DC into the ring, join with a slip stitch.
- Round 2: DC in next stitch, 2 DC in next stitch repeat around.
- Continue increasing until the base fits your plant pot.
- Sides:
- Work SC in back loops only (BLO) around.
- Continue SC in each stitch around for 10-15 rounds until the height matches the pot.
- Straps for Hanging:
- Chain 50 stitches for each strap and attach evenly around the top.
- Gather all straps at the top and attach to a wooden ring.
- Finish:
- Fasten off, weave in ends, and insert your pot!
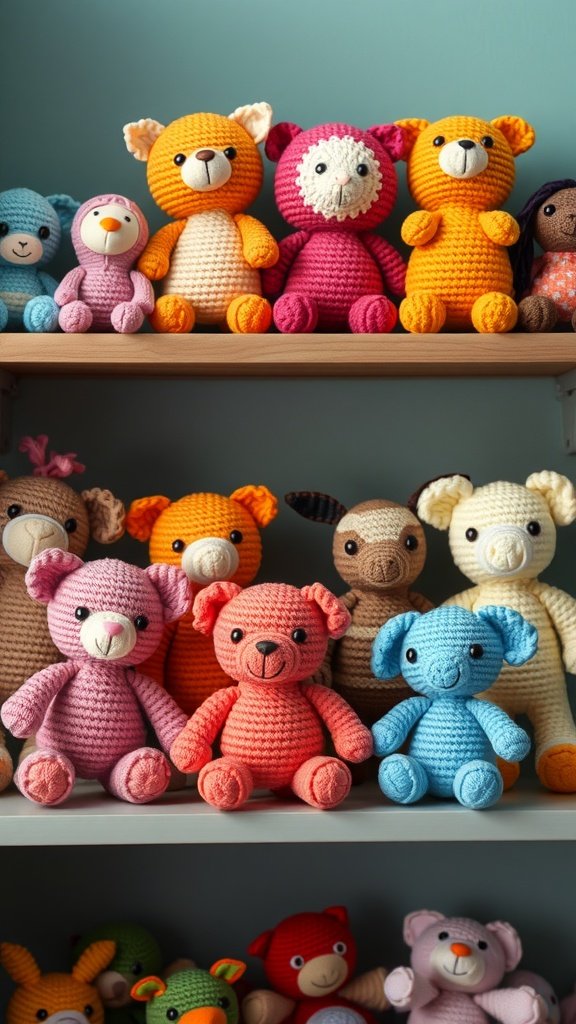
14. Playful Crochet Toys
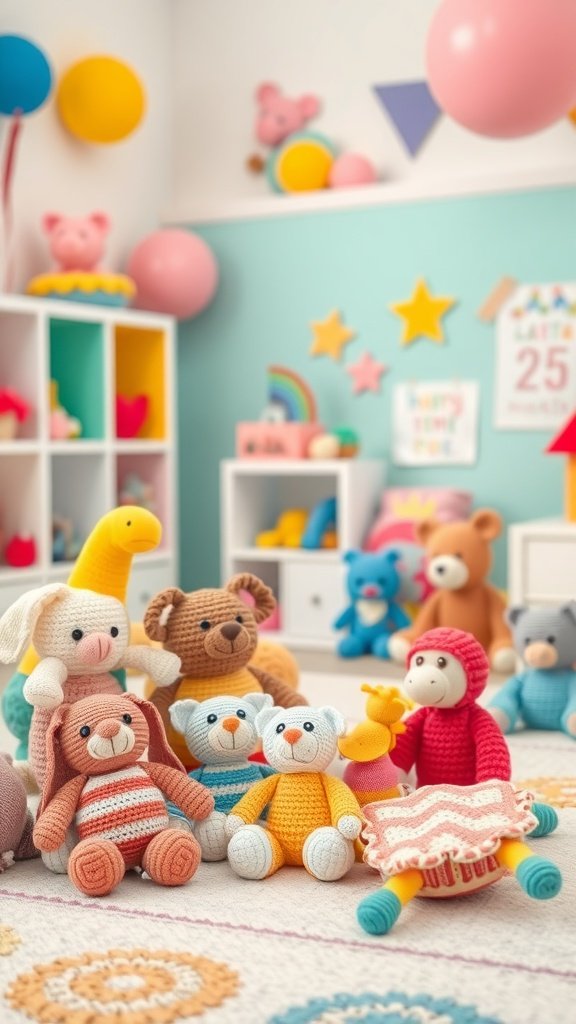
When it comes to quick crochet projects, making playful toys is a delightful way to express creativity. The image showcases a vibrant assortment of crochet animals, each with its unique charm. From colorful bears to cheerful bunnies, these toys bring joy to both the maker and the little ones who receive them.
Creating these easy crochet projects is a rewarding experience. Not only do you get to practice your crochet skills, but you also end up with adorable toys that can be used for play or decoration. Let’s dive into how you can create some of these fun crochet toys!
(Basic Amigurumi Shape)
What You Need:
- Worsted weight yarn (various colors)
- Size G/6 (4.0mm) crochet hook
- Stuffing (polyfill)
- Safety eyes (or black yarn for embroidery)
- Scissors
- Yarn needle
Instructions:
- Head & Body (Work in the Round):
- Make a magic ring and work 6 SC into it.
- Round 1: 2 SC in each stitch (12 total).
- Round 2: SC in next stitch, 2 SC in next stitch (18 total).
- Continue increasing until 36 SC is reached.
- Rounds 6-12: SC evenly around.
- Start decreasing to shape the body.
- Ears, Arms, and Legs:
- Make 4 small ovals (for arms and legs) starting with 6 SC in a magic ring and increasing to 12.
- Sew to the body.
- Facial Features:
- Attach safety eyes between rounds 6 and 7.
- Use embroidery thread or yarn to stitch a nose and mouth.
- Finishing:
- Stuff the body firmly before closing.
- Weave in ends and enjoy your plush toy!
See below for free toy patterns.
For free patterns in more detail go here: https://www.allfreecrochet.com/Crochet-Amigurumi-Patterns/Mini-Crochet-Animals-Free-Patterns
or here: https://easycrochet.com/category/crochet-patterns/amigurumi-crochet-patterns/page/2/
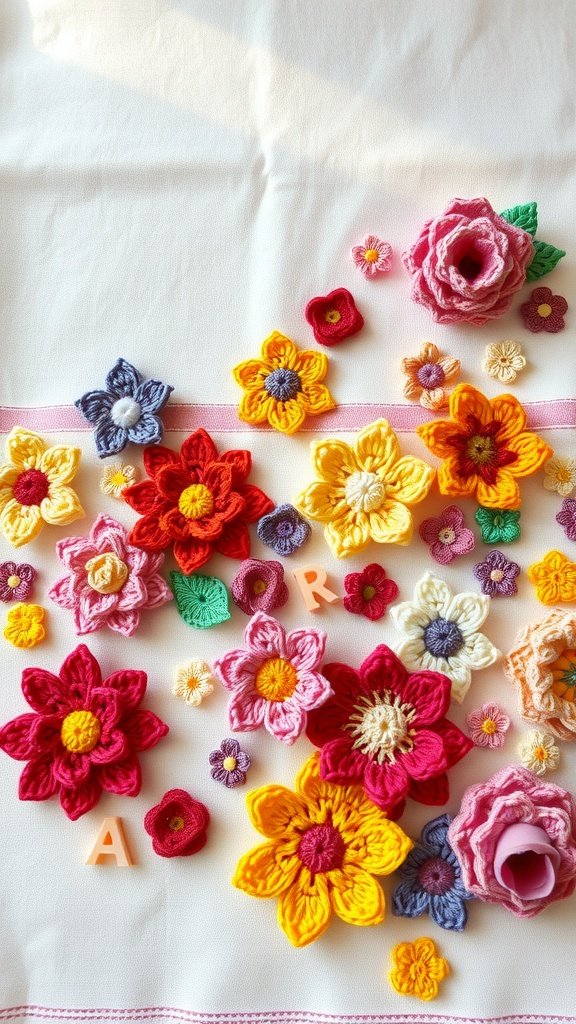
15. Colorful Crochet Flower Appliqués
Colorful crochet flower appliqués are a delightful way to add charm to any project. These little blooms can brighten up clothing, accessories, or home décor. They come in various shapes and sizes, making them versatile for all kinds of easy crochet projects.
The image showcases a vibrant array of crochet flowers in different colors, from bold reds to soft pinks and sunny yellows. Each flower is intricately designed, highlighting the beauty of crochet art. With just a few materials and some simple stitches, you can create these lovely additions to enhance your crafts.
To get started, here’s what you’ll need:
What is Needed:
- Crochet yarn in various colors
- Crochet hook (appropriate size for your yarn)
- Scissors
- Tapestry needle
- Optional: Buttons or beads for embellishments
Now, let’s dive into the instructions to make a simple crochet flower:
Instructions:
- Start with a magic ring. Chain 2 (this counts as your first double crochet).
- In the ring, work 11 double crochets (you’ll have a total of 12 stitches including the initial chain). Pull the magic ring tightly to close.
- Slip stitch into the top of the first double crochet to join.
- For the petals, chain 3 and then make a slip stitch into the next stitch. Repeat this until you have 6 petals.
- To finish, fasten off and weave in the ends with a tapestry needle.
These easy crochet flowers are perfect for beginners and can be completed in a short amount of time. You can mix and match colors to create a custom look. Enjoy experimenting with different sizes and styles to add your personal touch!
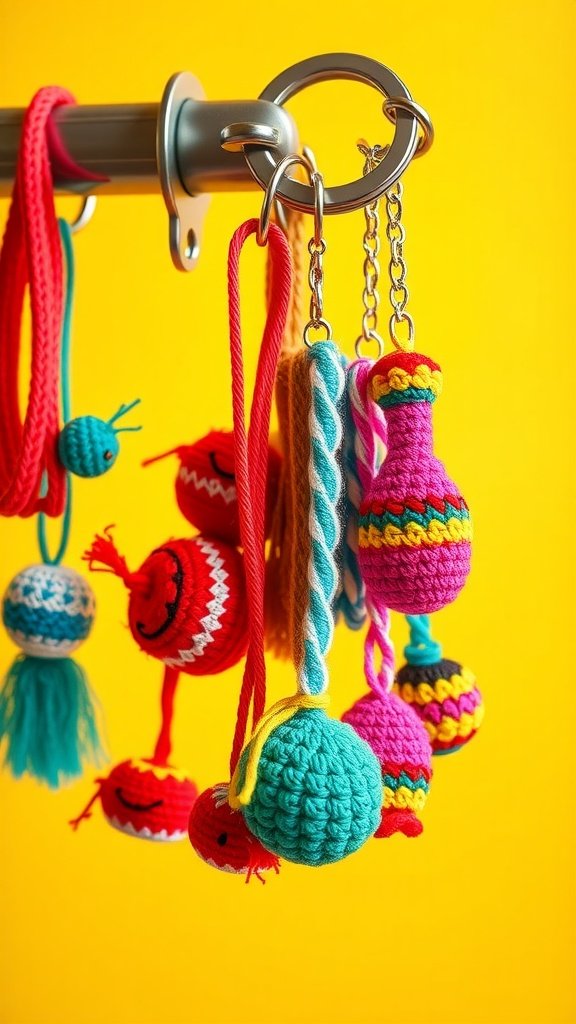
16. Handy Crochet Cable Ties
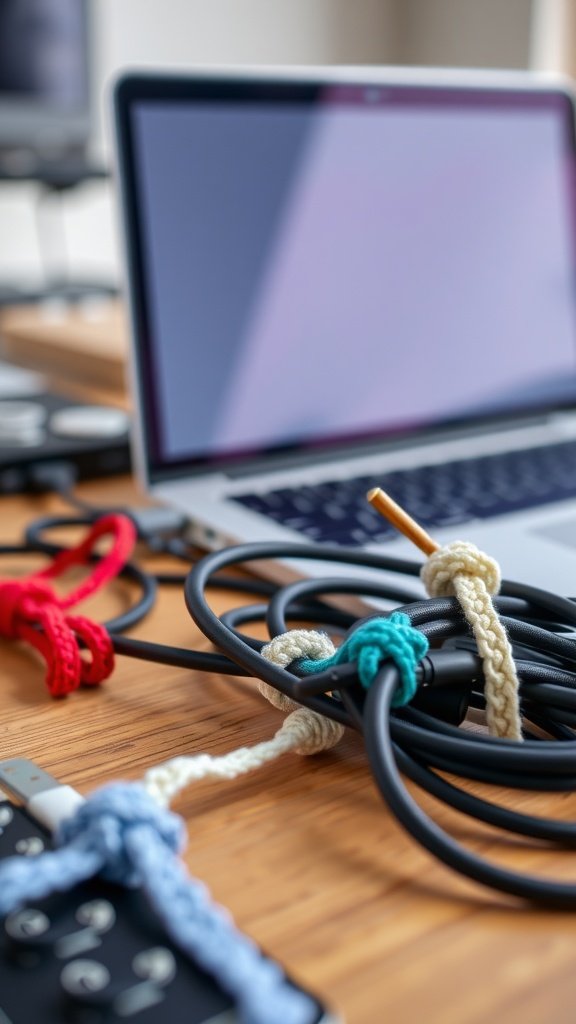
If you’re tired of tangled cords and cables cluttering your workspace, crochet cable ties are a simple solution. These ties not only keep everything organized but also add a touch of color and personality to your setup. Plus, they’re quick crochet projects, perfect for using up scraps of yarn you might have lying around.
In the image, we see colorful crochet cable ties neatly holding together various cables next to a laptop. This shows how easy crochet can transform your everyday items into something functional and stylish.
What You Need:
- Cotton yarn
- Size G/6 (4.0mm) crochet hook
- Small button
- Scissors
- Yarn needle
Instructions:
- Foundation:
- Chain 16 (adjust for cable size).
- Row 1:
- SC in the second chain from the hook and in each stitch across.
- Rows 2-4:
- Continue working SC across for a sturdy texture.
- Button Loop:
- Chain 6, skip 3 stitches, slip stitch into the last stitch.
- Attach Button:
- Sew a button onto the opposite end.
- Finishing:
- Fasten off and weave in ends.
- Use to wrap and secure charging cables or earphones!
17. Crochet Bag for Beginners
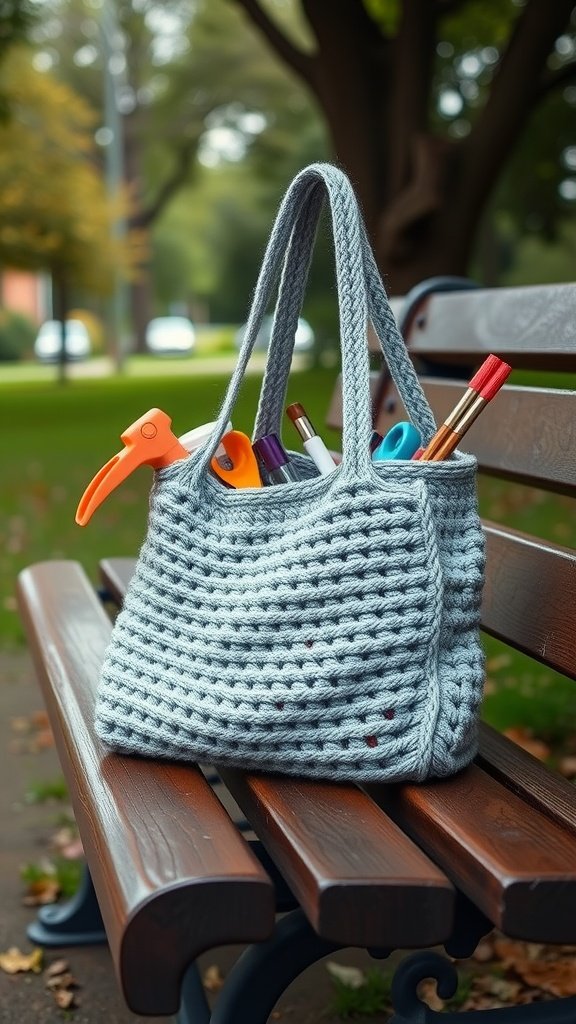
Creating your own crochet bag is one of the easiest crochet projects to start with. Not only is it functional, but it’s also a great way to practice basic stitches while making something you can use every day. The bag in the image shows how simple and stylish a beginner’s crochet project can be.
This bag is perfect for carrying your essentials, whether you’re heading to a craft session or a day out. It looks cozy and has enough space to hold items like pens, notebooks, or even snacks!
To get started on your own crochet bag, here’s what you’ll need:
What is Needed
- Yarn (medium weight)
- Crochet hook (size H/8 – 5.0 mm)
- Scissors
- Tapestry needle
Instructions
1. **Start with a Chain:** Begin by chaining 30 stitches. This will be the base of your bag.
2. **Row 1 – Single Crochet:** In the second chain from the hook, make a single crochet stitch. Continue making single crochet stitches across the chain. At the end of the row, chain 1 and turn your work.
3. **Continue Rows:** Repeat the single crochet for about 20 rows or until the piece measures around 12 inches in length.
4. **Form the Sides:** Fold the piece in half. Now, crochet along the side edges to seam it up. You can use slip stitches or single crochet for this step.
5. **Create the Handles:** For the bag handles, chain about 10 stitches. Attach this chain to the top of the bag with a slip stitch. Repeat on the other side for symmetry.
6. **Finishing Touches:** Weave in any loose ends using a tapestry needle. Make sure everything is secure, and your bag is ready to use!
This quick crochet project is a fantastic way to build your skills and end up with something you can display proudly. Enjoy making your crochet bag!
18. Charming Crochet Flower Pots
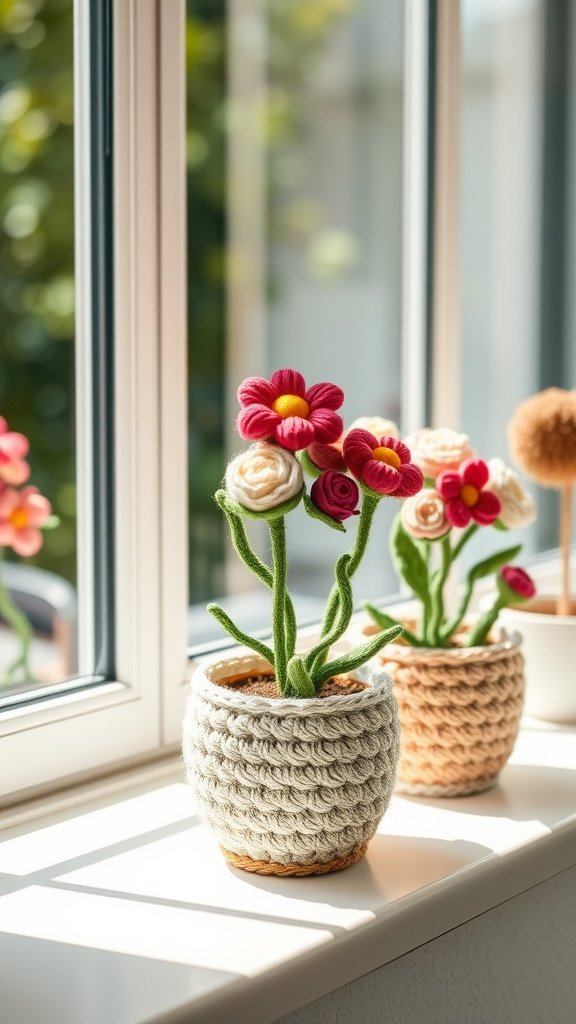
Crochet flower pots bring a touch of joy to any space. They are not only adorable but also a breeze to make! This easy crochet project is perfect for both beginners and seasoned crafters looking for a quick crochet idea to brighten their homes.
In the image, you can see beautifully crafted flower pots showcasing vibrant flowers. The pots are cozy and inviting, making them a delightful addition to your window sill or desk. Using simple crochet techniques, you can replicate this charming project.
What You Need:
- Cotton or jute yarn (for sturdiness)
- Size H/8 (5.0mm) crochet hook
- Scissors
- Yarn needle
- Small flower pot (optional for shaping)
Instructions:
- Base of the Pot:
- Make a magic ring, chain 2.
- Work 12 double crochets (DC) into the ring. Slip stitch to join.
- Increase Rounds:
- Round 1: Chain 2, 2 DC in each stitch around (24 total).
- Round 2: Chain 2, DC in next stitch, 2 DC in next stitch, repeat around (36 total).
- Forming the Sides:
- Round 3: Work back loop only (BLO) SC in each stitch to create a defined base.
- Rounds 4-10: Continue SC in each stitch around.
- Finishing:
- Slip stitch around the top edge for a finished look.
- Fasten off and weave in ends.
- Insert your plant pot or shape the crochet flower pot by stiffening the yarn.
19. Quick Crochet Shawls
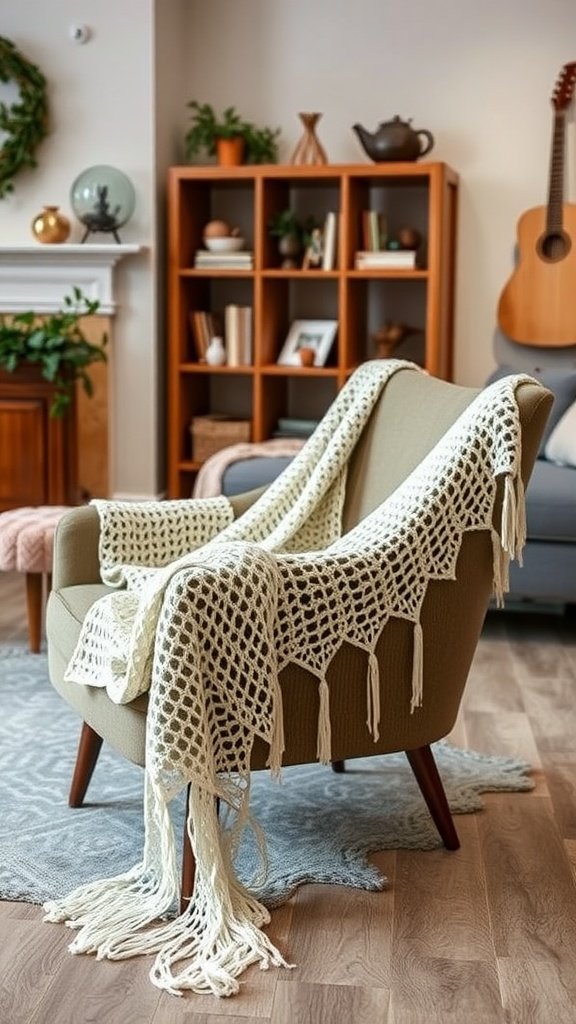
In the world of easy crochet projects, quick crochet shawls stand out for their simplicity and charm. The image showcases a cozy shawl draped over a stylish chair, inviting you to wrap yourself in its warmth. This particular design features an open stitch pattern, making it both lightweight and airy—perfect for layering!
Creating your own quick crochet shawl is not only fun but also rewarding. They make thoughtful gifts or a lovely addition to your own wardrobe. Plus, if you’re looking for a project that doesn’t take ages to complete, this is an ideal choice.
What You Need:
- Lightweight or medium-weight yarn
- Size J/10 (6.0mm) crochet hook
- Scissors
- Yarn needle
Instructions:
- Foundation Row:
- Chain 4, join into a ring with a slip stitch.
- Chain 3 (counts as first DC), 2 DC into the ring, chain 2, 3 DC into the ring.
- Increase Rows:
- Row 1: Chain 3, turn, 2 DC in first stitch, DC across to chain-2 space.
- Work (DC, chain 2, DC) into chain-2 space (this creates the center point of the shawl).
- Continue with DC to the end, 2 DC in last stitch.
- Repeat Row 1 Pattern:
- Keep increasing at the beginning, middle, and end of each row.
- Work in this pattern until the shawl reaches the desired size.
- Finishing Touch:
- Work a shell stitch border (5 DC in one stitch, skip 2 stitches, SC in next stitch) for a decorative edge.
- Fasten off and weave in ends.
20. Easy Crochet Baby Blanket
Creating a cozy baby blanket is a delightful way to practice easy crochet. This lovely blanket features cheerful colors and cute motifs, perfect for keeping little ones warm and snug.
To make this blanket, you’ll need some basic supplies. The yarn is soft, making it gentle against the baby’s skin. The colors not only brighten up the nursery but also add a playful touch.
The pattern is straightforward and great for beginners. You can use basic crochet stitches like single crochet and double crochet, making it a quick crochet project. Adding little details like flowers or shapes enhances the charm of the blanket.
What You Need:
- Soft worsted weight or baby yarn
- Size I/9 (5.5mm) crochet hook
- Scissors
- Yarn needle
Instructions:
- Foundation Chain:
- Chain 90-120 stitches (or desired width).
- Row 1 (Base Row):
- In the second chain from the hook, work 1 half double crochet (HDC) across.
- Chain 1, turn.
- Row 2-50 (or until the desired length):
- Work HDC in each stitch across, always chaining 1 before turning.
- Optional Border:
- Work SC evenly around the blanket, placing 3 SC in each corner.
- For a decorative finish, use shell stitch or crab stitch for the edge.
- Finishing:
- Fasten off and weave in ends.
- Block the blanket if needed for an even shape.
21. Simple Crochet Beanies
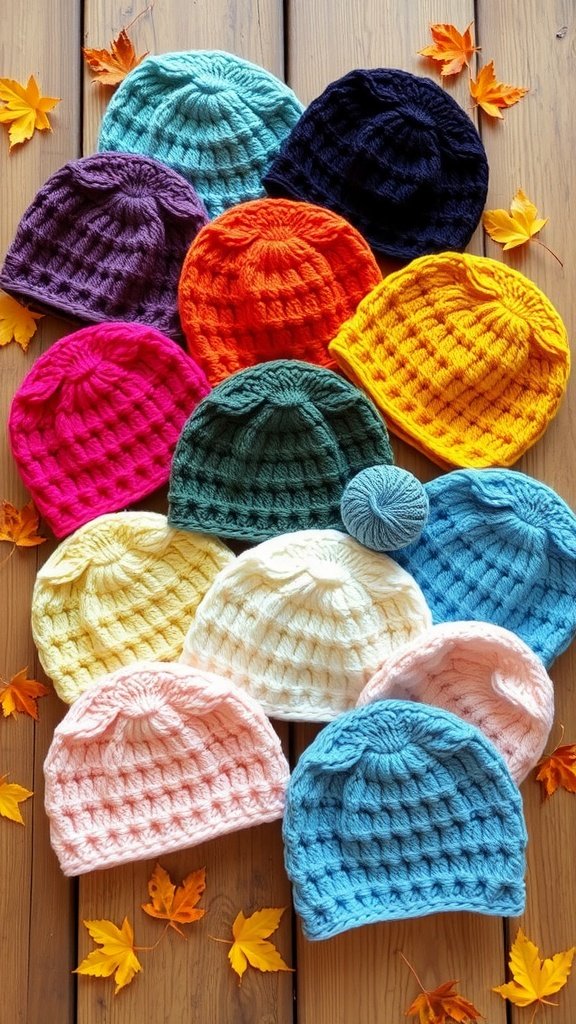
Crocheting beanies is one of the most enjoyable and easy crochet projects you can dive into. The image shows a colorful collection of beanies that are both stylish and warm. Each beanie features a unique texture, showcasing the beauty of crochet work.
Getting started with crochet beanies is straightforward. You can choose vibrant yarns to match your mood or the season. Plus, these make excellent gifts for friends and family!
Here’s what you will need to make your own crochet beanie:
- Yarn (medium weight)
- Crochet hook (size H/8 or 5mm)
- Scissors
- Tapestry needle
Now, let’s go through the basic instructions:
Instructions:
1. Start with a magic ring. This will be the top of your beanie.
2. Chain 2, then work 10 double crochet (dc) into the ring. Pull the tail to tighten the ring. Join with a slip stitch (sl st) to the top of the first dc.
3. For the second round, chain 2, then work 2 dc in each stitch around (20 dc total). Join with a sl st.
4. Continue to increase by working 1 dc in the first stitch and 2 dc in the next stitch for each new round until you’ve reached the desired diameter for the beanie.
5. For the body of the beanie, switch to working even rounds with 1 dc in each stitch until you’ve achieved your desired length.
6. To finish, create a ribbed brim by working in back loops only (BLO) for the last few rounds.
7. Fasten off and weave in any loose ends with your tapestry needle.
These simple steps allow you to create fun and cozy beanies in no time. Try experimenting with different stitches or colors for even more quick crochet options!
Happy Crocheting!